我知道同样的问题已经出现了很多次,我已经尝试了我能找到的每一个解决方案,但没有任何效果。
我每帧接收 3 个缓冲区(每个缓冲区对应 Y、Cr、Cb)。我目前只是将它们绑定(bind)到红色 channel 。 Y 缓冲区为 1 字节/像素,Cr 和 Cb 缓冲区为 1/4 大小,因此它与我看到的 U 和 V 纹理贴图使用 width/2 和 height/2 的示例很好地结合在一起,如下所示;
int glFormat = GL20.GL_RED;
int glType = GL20.GL_UNSIGNED_BYTE;
int glInternalFormat = GL20.GL_RED;

GL20.glActiveTexture(GL20.GL_TEXTURE0);
GL20.glBindTexture(glTarget, yTexHandle);
GL20.glTexImage2D(glTarget, 0, glInternalFormat, width, height, 0, glFormat, glType, buffer);

int uvWidth = videoWidth/2;
int uvHeight = videoHeight/2;

GL20.glActiveTexture(GL20.GL_TEXTURE0+2);
GL20.glBindTexture(glTarget, cbTexHandle);
GL20.glTexImage2D(glTarget, 0, glInternalFormat, uvWidth, uvHeigth, 0, glFormat, glType, cbBuffer);
GL20.glActiveTexture(GL20.GL_TEXTURE0+1);
GL20.glBindTexture(glTarget, crTexHandle);
GL20.glTexImage2D(glTarget, 0, glInternalFormat, uvWidth, uvHeight, 0, glFormat, glType, crBuffer);
这是我的碎片着色器;
uniform sampler2D u_texture;
uniform sampler2D u_texture_cr;
uniform sampler2D u_texture_cb;

void main() {
  float y = texture2D(u_texture, v_texCoords).r;
  float u = texture2D(u_texture_cr, v_texCoords).r - 0.5;
  float v = texture2D(u_texture_cb, v_texCoords).r - 0.5;
  float r = y + 1.402 * v;
  float g = y - 0.344 * u - 0.714 * v;
  float b = y + 1.772 * u;
  gl_FragColor = v_color * vec4(r, g, b, 1.0);
}
虽然它可能不是最好的转换算法,但我已经尝试了我能找到的所有替代算法,它看起来总是大致相同,非常绿色和非常粉红色。
我认为问题在于缓冲区本身,或者它们如何绑定(bind)到 GL,而不是碎片着色器本身。我尝试过切换 u 和 v,甚至尝试对所有内容使用 u,对所有内容尝试 v,结果总是相同,所以看起来当 u 和 v 缓冲区到达着色器时它们不正确。
我已经打印了 Cb 和 Cr 缓冲区的片段,以了解它们的值是什么,这是一个示例;
Cr: -124 Cb: 110
Cr: -126 Cb: 109
Cr: -127 Cb: 107
Cr: -128 Cb: 106
Cr: 127 Cb: 104
Cr: 127 Cb: 101
Cr: 127 Cb: 99
注意这是一个 Java ByteBuffer。我尝试过使用 glType 作为 GL_BYTE 而不是 GL_UNSIGNED_BYTE,但它看起来更糟糕。我还尝试使用 GL_ALPHA 或 GL_LUMINANCE 的 alpha channel 作为格式,GL_LUMINANCE 看起来略有不同,但输出仍然大致相同。
来自 2 个不同视频的屏幕截图; 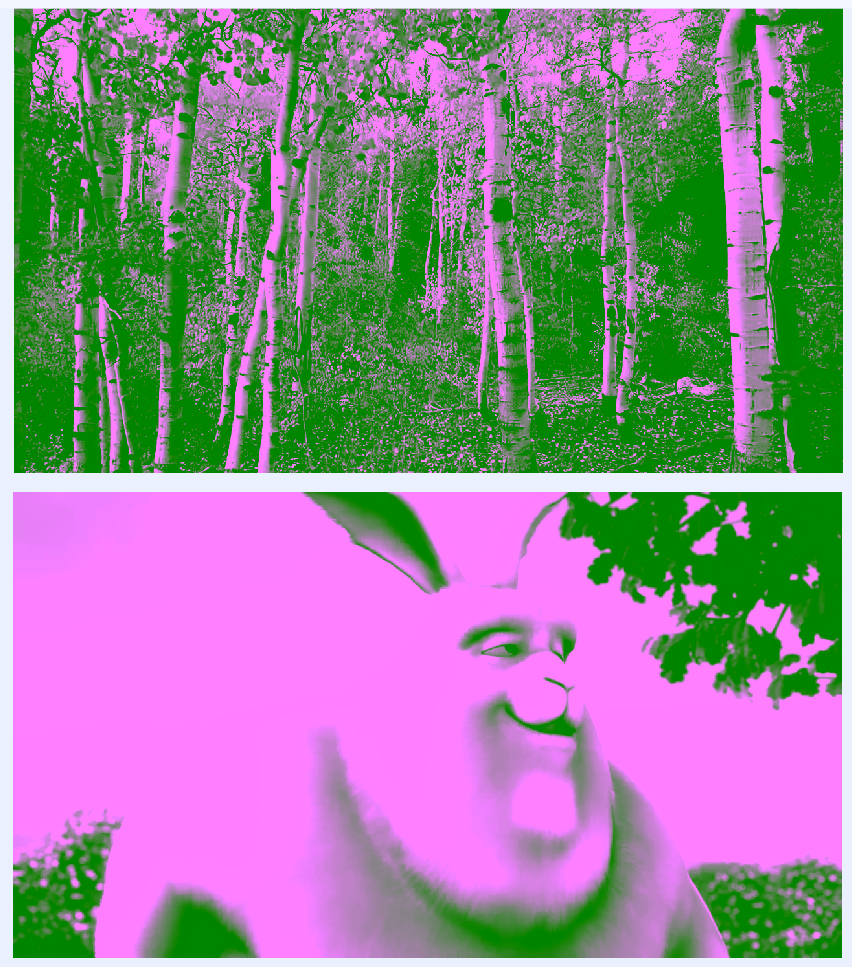
此外,我从中获取这些帧的包能够转换为 RGBA 帧,这非常有效,但这是一个昂贵的过程(与 ~2ms 相比,约为 30ms)。它也是一个 native 方法,我找不到它的源代码,所以我不知道它在后台做什么,但我想这证明了当我获取缓冲区时它们是正确的。
更新
我尝试按照 MoDJ 的建议在着色器中实现 Gamma 和饱和度,使用 this (BT709 conversions)从那个答案。但输出仍然几乎相同。着色器导致了这个结果;
uniform sampler2D u_texture;
uniform sampler2D u_texture_cr;
uniform sampler2D u_texture_cb;

const float yScale = 255.0 / (235.0 - 16.0); //(BT709_YMax-BT709_YMin)
const float uvScale = 255.0 / (240.0 - 16.0); //(BT709_UVMax-BT709_UVMin)

float BT709_nonLinearNormToLinear(float normV) {
    if (normV < 0.081) {
        normV *= (1.0 / 4.5);
    } else {
        float a = 0.099;
        float gamma = 1.0 / 0.45;
        normV = (normV + a) * (1.0 / (1.0 + a));
        normV = pow(normV, gamma);
    }
    return normV;
}

void main() {
    float y = texture2D(u_texture, v_texCoords).r;
    float u = texture2D(u_texture_cr, v_texCoords).r - 0.5;
    float v = texture2D(u_texture_cb, v_texCoords).r - 0.5;

    y = y - 16.0/255.0;

    float r = y*yScale +                          v*uvScale*1.5748;
    float g = y*yScale - u*uvScale*1.8556*0.101 - v*uvScale*1.5748*0.2973;
    float b = y*yScale + u*uvScale*1.8556;

    r = clamp(r, 0.0, 1.0);
    g = clamp(g, 0.0, 1.0);
    b = clamp(b, 0.0, 1.0);

    r = BT709_nonLinearNormToLinear(r);
    g = BT709_nonLinearNormToLinear(g);
    b = BT709_nonLinearNormToLinear(b);
最佳答案
我刚刚解决了这个在设置着色器制服时出现的愚蠢错误!
这就是我正在做的事情;
GL20.glActiveTexture(GL20.GL_TEXTURE0+2);
GL20.glBindTexture(GL20.GL_TEXTURE_2D, cbTexHandle);
program.setUniformi("u_texture_cb", GL20.GL_TEXTURE0+2);

GL20.glActiveTexture(GL20.GL_TEXTURE0+1);
GL20.glBindTexture(GL20.GL_TEXTURE_2D, crTexHandle);
program.setUniformi("u_texture_cr", GL20.GL_TEXTURE0+1);
实际上应该是;
program.setUniformi("u_texture_cb", 2);
program.setUniformi("u_texture_cr", 1);
因此,如果您最终从 YUV 着色器获得绿色和粉色显示,我相信这只是因为实际上没有获得任何 UV 值(它们可能只是全零)
关于java - 在 GLSL 片段着色器中将 YUV (yCbCr420p) 转换为 RGB?,我们在Stack Overflow上找到一个类似的问题: https://stackoverflow.com/questions/55930123/