我没有图像或图形方面的背景,所以请耐心等待 :)
我正在使用 JavaCV在我的一个项目中。在examples , 构建了一个 Frame,它有一个 certain size 的缓冲区.
在Android中使用public void onPreviewFrame(byte[] data, Camera camera)函数时,复制这个data字节数组是没有问题的,如果你声明Frame as new Frame(frameWidth, frameHeight, Frame.DEPTH_UBYTE, 2); 其中 frameWidth 和 frameHeight 声明为
Camera.Size previewSize = cameraParam.getPreviewSize();
int frameWidth = previewSize.width;
int frameHeight = previewSize.height;
最近,Android 添加了一种捕获屏幕的方法。自然地,我想抓取这些图像并将它们转换为 Frame。我修改了the example code from Google使用 ImageReader .
此 ImageReader 构造为 ImageReader.newInstance(DISPLAY_WIDTH, DISPLAY_HEIGHT, PixelFormat.RGBA_8888, 2);。所以目前它使用 RGBA_8888 像素格式。我使用以下代码将字节复制到 Frame,它被实例化为 new Frame(DISPLAY_WIDTH, DISPLAY_HEIGHT, Frame.DEPTH_UBYTE, 2);:
ByteBuffer buffer = mImage.getPlanes()[0].getBuffer();
byte[] bytes = new byte[buffer.remaining()];
buffer.get(bytes);
mImage.close();
((ByteBuffer) frame.image[0].position(0)).put(bytes);
但这给了我一个 java.nio.BufferOverflowException。我打印了两个缓冲区的大小,Frame 的缓冲区大小为 691200,而上面的 bytes 数组的大小为 1413056。由于I ran into this native call,弄清楚后一个数字是如何构造的失败了。 .很明显,这是行不通的。
经过大量挖掘后,我发现 NV21 image format是“相机预览图像的默认格式,当没有使用 setPreviewFormat(int) 设置时”,但是 ImageReader class does not support the NV21 format (请参阅格式参数)。所以运气不好。在文档中它还读到 “对于 android.hardware.camera2 API,建议使用 YUV_420_888 格式代替 YUV 输出。”
所以我尝试创建一个像这样的 ImageReader ImageReader.newInstance(DISPLAY_WIDTH, DISPLAY_HEIGHT, ImageFormat.YUV_420_888, 2);,但这给了我 java.lang.UnsupportedOperationException: The producer output缓冲区格式 0x1 与 ImageReader 配置的缓冲区格式 0x23 不匹配。 因此这也不起作用。
作为最后的手段,我尝试自己将 RGBA_8888 转换为 YUV,例如使用this post ,但我不明白如何根据答案获得 int[] rgba。
所以,长话短说 我怎样才能像在 Android 的 public void onPreviewFrame(byte[] data, Camera camera) 相机函数中获取 NV21 图像数据来实例化我的 Frame 并使用 Android 的 ImageReader(和 Media Projection)处理它?</strong>
编辑 (25-10-2016)
我创建了以下可运行的转换以从 RGBA 格式转换为 NV21 格式:
private class updateImage implements Runnable {

    private final Image mImage;

    public updateImage(Image image) {
        mImage = image;
    }

    @Override
    public void run() {

        int mWidth = mImage.getWidth();
        int mHeight = mImage.getHeight();

        // Four bytes per pixel: width * height * 4.
        byte[] rgbaBytes = new byte[mWidth * mHeight * 4];
        // put the data into the rgbaBytes array.
        mImage.getPlanes()[0].getBuffer().get(rgbaBytes);

        mImage.close(); // Access to the image is no longer needed, release it.

        // Create a yuv byte array: width * height * 1.5 ().
        byte[] yuv = new byte[mWidth * mHeight * 3 / 2];
        RGBtoNV21(yuv, rgbaBytes, mWidth, mHeight);
        ((ByteBuffer) yuvImage.image[0].position(0)).put(yuv);
    }

    void RGBtoNV21(byte[] yuv420sp, byte[] argb, int width, int height) {
        final int frameSize = width * height;

        int yIndex = 0;
        int uvIndex = frameSize;

        int A, R, G, B, Y, U, V;
        int index = 0;
        int rgbIndex = 0;

        for (int i = 0; i < height; i++) {
            for (int j = 0; j < width; j++) {

                R = argb[rgbIndex++];
                G = argb[rgbIndex++];
                B = argb[rgbIndex++];
                A = argb[rgbIndex++]; // Ignored right now.

                // RGB to YUV conversion according to
                // https://en.wikipedia.org/wiki/YUV#Y.E2.80.B2UV444_to_RGB888_conversion
                Y = ((66 * R + 129 * G + 25 * B + 128) >> 8) + 16;
                U = ((-38 * R - 74 * G + 112 * B + 128) >> 8) + 128;
                V = ((112 * R - 94 * G - 18 * B + 128) >> 8) + 128;

                // NV21 has a plane of Y and interleaved planes of VU each sampled by a factor
                // of 2 meaning for every 4 Y pixels there are 1 V and 1 U.
                // Note the sampling is every other pixel AND every other scanline.
                yuv420sp[yIndex++] = (byte) ((Y < 0) ? 0 : ((Y > 255) ? 255 : Y));
                if (i % 2 == 0 && index % 2 == 0) {
                    yuv420sp[uvIndex++] = (byte) ((V < 0) ? 0 : ((V > 255) ? 255 : V));
                    yuv420sp[uvIndex++] = (byte) ((U < 0) ? 0 : ((U > 255) ? 255 : U));
                }
                index++;
            }
        }
    }
}
yuvImage 对象被初始化为 yuvImage = new Frame(DISPLAY_WIDTH, DISPLAY_HEIGHT, Frame.DEPTH_UBYTE, 2);,DISPLAY_WIDTH 和DISPLAY_HEIGHT 只是指定显示大小的两个整数。
这是后台处理程序处理 onImageReady 的代码:
private final ImageReader.OnImageAvailableListener mOnImageAvailableListener
            = new ImageReader.OnImageAvailableListener() {

        @Override
        public void onImageAvailable(ImageReader reader) {
            mBackgroundHandler.post(new updateImage(reader.acquireNextImage()));
        }

    };

...

mImageReader = ImageReader.newInstance(DISPLAY_WIDTH, DISPLAY_HEIGHT, PixelFormat.RGBA_8888, 2);
mImageReader.setOnImageAvailableListener(mOnImageAvailableListener, mBackgroundHandler);
这些方法有效,我至少没有收到任何错误,但输出图像格式不正确。我的转换出了什么问题?正在创建的示例图像:
编辑 (15-11-2016)
我已将 RGBtoNV21 函数修改为以下内容:
void RGBtoNV21(byte[] yuv420sp, int width, int height) {
    try {
        final int frameSize = width * height;

        int yIndex = 0;
        int uvIndex = frameSize;
        int pixelStride = mImage.getPlanes()[0].getPixelStride();
        int rowStride = mImage.getPlanes()[0].getRowStride();
        int rowPadding = rowStride - pixelStride * width;
        ByteBuffer buffer = mImage.getPlanes()[0].getBuffer();

        Bitmap bitmap = Bitmap.createBitmap(getResources().getDisplayMetrics(), width, height, Bitmap.Config.ARGB_8888);

        int A, R, G, B, Y, U, V;
        int offset = 0;

        for (int i = 0; i < height; i++) {
            for (int j = 0; j < width; j++) {

                // Useful link: https://stackoverflow.com/questions/26673127/android-imagereader-acquirelatestimage-returns-invalid-jpg

                R = (buffer.get(offset) & 0xff) << 16;     // R
                G = (buffer.get(offset + 1) & 0xff) << 8;  // G
                B = (buffer.get(offset + 2) & 0xff);       // B
                A = (buffer.get(offset + 3) & 0xff) << 24; // A
                offset += pixelStride;

                int pixel = 0;
                pixel |= R;     // R
                pixel |= G;  // G
                pixel |= B;       // B
                pixel |= A; // A
                bitmap.setPixel(j, i, pixel);

                // RGB to YUV conversion according to
                // https://en.wikipedia.org/wiki/YUV#Y.E2.80.B2UV444_to_RGB888_conversion
//                        Y = ((66 * R + 129 * G + 25 * B + 128) >> 8) + 16;
//                        U = ((-38 * R - 74 * G + 112 * B + 128) >> 8) + 128;
//                        V = ((112 * R - 94 * G - 18 * B + 128) >> 8) + 128;

                Y = (int) Math.round(R *  .299000 + G *  .587000 + B *  .114000);
                U = (int) Math.round(R * -.168736 + G * -.331264 + B *  .500000 + 128);
                V = (int) Math.round(R *  .500000 + G * -.418688 + B * -.081312 + 128);

                // NV21 has a plane of Y and interleaved planes of VU each sampled by a factor
                // of 2 meaning for every 4 Y pixels there are 1 V and 1 U.
                // Note the sampling is every other pixel AND every other scanline.
                yuv420sp[yIndex++] = (byte) ((Y < 0) ? 0 : ((Y > 255) ? 255 : Y));
                if (i % 2 == 0 && j % 2 == 0) {
                    yuv420sp[uvIndex++] = (byte) ((V < 0) ? 0 : ((V > 255) ? 255 : V));
                    yuv420sp[uvIndex++] = (byte) ((U < 0) ? 0 : ((U > 255) ? 255 : U));
                }
            }
            offset += rowPadding;
        }

        File file = new File(Environment.getExternalStoragePublicDirectory(Environment.DIRECTORY_PICTURES).getAbsolutePath(), "/Awesomebitmap.png");
        FileOutputStream fos = new FileOutputStream(file);
        bitmap.compress(Bitmap.CompressFormat.PNG, 100, fos);
    } catch (Exception e) {
        Timber.e(e, "Converting image to NV21 went wrong.");
    }
}
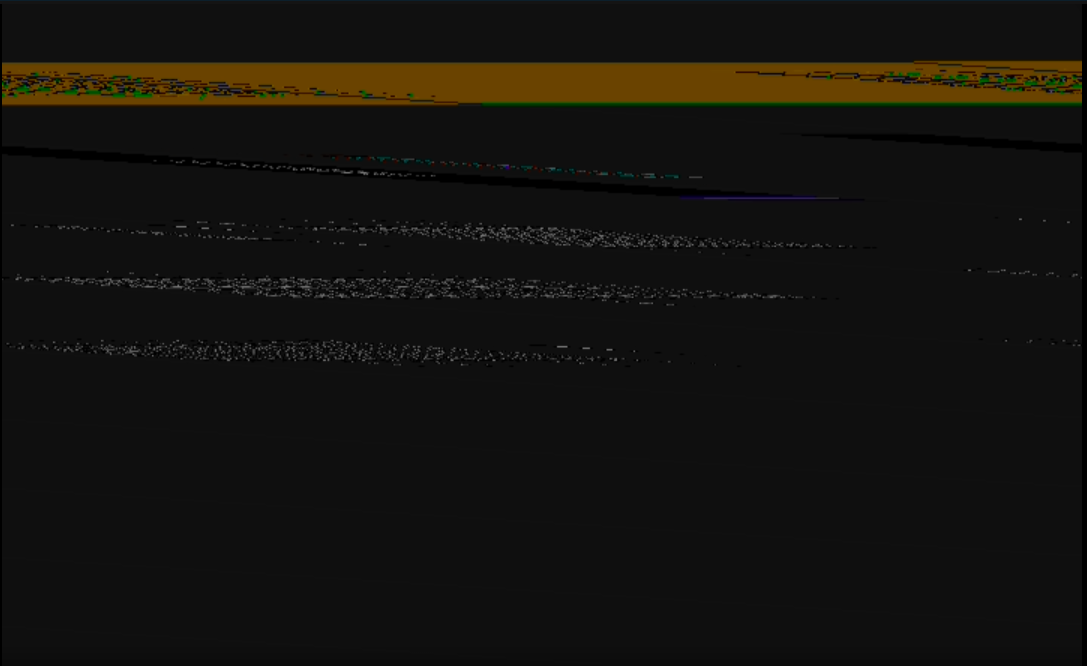
现在图像不再畸形,但色度已关闭。
右侧是在该循环中创建的位图,左侧是保存到图像的 NV21。所以 RGB 像素被正确处理。显然色度已关闭,但 RGB 到 YUV 的转换应该与维基百科描述的相同。这里可能出了什么问题?
最佳答案
一般来说,ImageReader 的目的是让您以最小的开销原始访问发送到 Surface 的像素,因此尝试让它执行颜色转换没有意义。
对于相机,您可以选择两种输出格式(NV21 或 YV12)中的一种,因此请选择 YV12。那是你的原始 YUV 数据。对于屏幕捕获,输出将始终为 RGB,因此您需要选择 RGBA_8888 (format 0x1)对于您的 ImageReader,而不是 YUV_420_888 (format 0x23) .如果为此需要 YUV,则必须自己进行转换。 ImageReader 为您提供了一系列 Plane 对象,而不是 byte[],因此您需要适应它。
关于Android ImageReader 获取 NV21 格式?,我们在Stack Overflow上找到一个类似的问题: https://stackoverflow.com/questions/35709241/