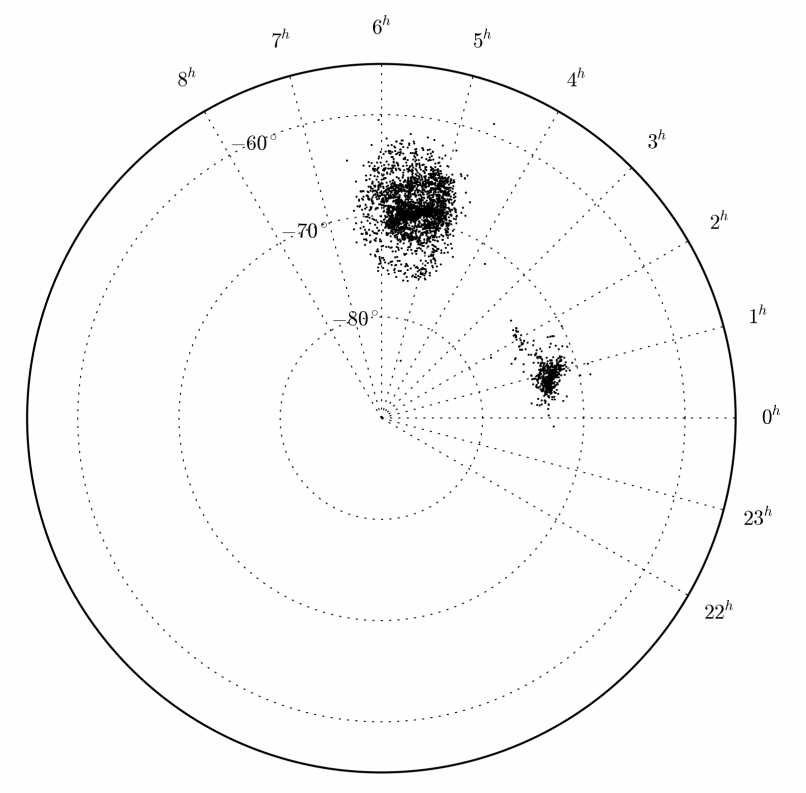
我正在尝试生成一个应该看起来或多或少像这样的赤道坐标图:

(图取自this article,显示的是Large and Small MCs在赤道坐标中的位置)
关于这个情节需要注意的重要事项:
theta轴(即:赤经)在 h:m:s(小时、分钟、秒)中,因为它在天文学中是习惯的,而不是以度为单位,与matplotlib中的默认polar选项相同。r轴(即:赤纬)从 -90º 向外增加,网格以 (0h, -90º) 为中心。- 绘图被剪裁,这意味着它只显示了一部分而不是整个圆(默认情况下
matplotlib会显示)。
使用 matplotlib 中的 polar=True 选项,我设法生成的最接近的图是这个(下面的 MWE,数据文件here ; 与上图相比有些点不存在,因为数据文件有点小):
我还需要向图中添加第三列数据,这就是我添加颜色条并根据 z 数组为每个点着色的原因:

所以我现在最需要的是剪辑情节的方法。主要基于 this question和 this example @cphlewis 与 his answer 非常接近,但仍然缺少一些东西(在他的回答中提到)。
对于此问题的任何帮助和/或指示将不胜感激。
MWE
(注意我使用 gridspec 来定位子图,因为我需要在同一个输出图像文件中生成其中的几个)
import numpy as np
import matplotlib.pyplot as plt
import matplotlib.gridspec as gridspec

def skip_comments(f):
    '''
    Read lines that DO NOT start with a # symbol.
    '''
    for line in f:
        if not line.strip().startswith('#'):
            yield line

def get_data_bb():
    '''RA, DEC data file.
    '''

    # Path to data file.
    out_file = 'bb_cat.dat'

    # Read data file
    with open(out_file) as f:
        ra, dec = [], []

        for line in skip_comments(f):
            ra.append(float(line.split()[0]))
            dec.append(float(line.split()[1]))

    return ra, dec

# Read RA, DEC data from file.
ra, dec = get_data_bb()
# Convert RA from decimal degrees to radians.
ra = [x / 180.0 * 3.141593 for x in ra]

# Make plot.
fig = plt.figure(figsize=(20, 20))
gs = gridspec.GridSpec(4, 2)
# Position plot in figure using gridspec.
ax = plt.subplot(gs[0], polar=True)
ax.set_ylim(-90, -55)

# Set x,y ticks
angs = np.array([330., 345., 0., 15., 30., 45., 60., 75., 90., 105., 120.])
plt.xticks(angs * np.pi / 180., fontsize=8)
plt.yticks(np.arange(-80, -59, 10), fontsize=8)
ax.set_rlabel_position(120)
ax.set_xticklabels(['$22^h$', '$23^h$', '$0^h$', '$1^h$', '$2^h$', '$3^h$',
    '$4^h$', '$5^h$', '$6^h$', '$7^h$', '$8^h$'], fontsize=10)
ax.set_yticklabels(['$-80^{\circ}$', '$-70^{\circ}$', '$-60^{\circ}$'],
    fontsize=10)

# Plot points.
ax.scatter(ra, dec, marker='o', c='k', s=1, lw=0.)

# Use this block to generate colored points with a colorbar.
#cm = plt.cm.get_cmap('RdYlBu_r')
#z = np.random.random((len(ra), 1))  # RGB values
#SC = ax.scatter(ra, dec, marker='o', c=z, s=10, lw=0., cmap=cm)
# Colorbar
#cbar = plt.colorbar(SC, shrink=1., pad=0.05)
#cbar.ax.tick_params(labelsize=8)
#cbar.set_label('colorbar', fontsize=8)

# Output png file.
fig.tight_layout()
plt.savefig(ra_dec_plot.png', dpi=300)
最佳答案
获取颜色条可以通过将 OP 代码与 @cphlewis's excellent answer 合并来完成.我已将其作为交 key 解决方案发布在 request of the OP in chat 上.第一个版本的代码只是添加了一个颜色条,最终版本(在 EDIT 2 下)进行了轴仿射翻译并更正了一些参数/简化了代码以完全符合 OP 规范。
"""
An experimental support for curvilinear grid.
"""
import numpy as np
import  mpl_toolkits.axisartist.angle_helper as angle_helper
import matplotlib.cm as cmap
from matplotlib.projections import PolarAxes
from matplotlib.transforms import Affine2D

from mpl_toolkits.axisartist import SubplotHost

from mpl_toolkits.axisartist import GridHelperCurveLinear


def curvelinear_test2(fig):
    """
    polar projection, but in a rectangular box.
    """
    global ax1

    # see demo_curvelinear_grid.py for details
    tr = Affine2D().scale(np.pi/180., 1.) + PolarAxes.PolarTransform()

    extreme_finder = angle_helper.ExtremeFinderCycle(10, 60,
                                                     lon_cycle = 360,
                                                     lat_cycle = None,
                                                     lon_minmax = None,
                                                     lat_minmax = (0, np.inf),
                                                     )

    grid_locator1 = angle_helper.LocatorHMS(12) #changes theta gridline count
    tick_formatter1 = angle_helper.FormatterHMS()

    grid_locator2 = angle_helper.LocatorDMS(6)
    tick_formatter2 = angle_helper.FormatterDMS()

    grid_helper = GridHelperCurveLinear(tr,
                                        extreme_finder=extreme_finder,
                                        grid_locator1=grid_locator1,
                                        tick_formatter1=tick_formatter1,
                                        grid_locator2=grid_locator2,
                                        tick_formatter2=tick_formatter2
                                        )


    ax1 = SubplotHost(fig, 1, 1, 1, grid_helper=grid_helper)

    # make ticklabels of right and top axis visible.
    ax1.axis["right"].major_ticklabels.set_visible(True)
    ax1.axis["top"].major_ticklabels.set_visible(True)
    ax1.axis["bottom"].major_ticklabels.set_visible(True) #Turn off?
    # let right and bottom axis show ticklabels for 1st coordinate (angle)
    ax1.axis["right"].get_helper().nth_coord_ticks=0
    ax1.axis["bottom"].get_helper().nth_coord_ticks=0


    fig.add_subplot(ax1)

    grid_helper = ax1.get_grid_helper()

    ax1.set_aspect(1.)
    ax1.set_xlim(-4,15) # moves the origin left-right in ax1
    ax1.set_ylim(-3, 20) # moves the origin up-down

    ax1.set_ylabel('90$^\circ$ + Declination')
    ax1.set_xlabel('Ascension')
    ax1.grid(True)
    #ax1.grid(linestyle='--', which='x') # either keyword applies to both
    #ax1.grid(linestyle=':', which='y')  # sets of gridlines

    return tr

import matplotlib.pyplot as plt
fig = plt.figure(1, figsize=(5, 5))
fig.clf()

tr = curvelinear_test2(fig) # tr.transform_point((x, 0)) is always (0,0)
                            # => (theta, r) in but (r, theta) out...
r_test =   [0, 1.2, 2.8, 3.8, 5,  8,  10, 13.3, 17]  # distance from origin
deg_test = [0,  -7, 12,  28,  45, 70, 79, 90,   100] # degrees ascension
out_test = tr.transform(zip(deg_test, r_test))

sizes = [40, 30, 10, 30, 80, 33, 12, 48, 45]
#hues = [.9, .3, .2, .8, .6, .1, .4, .5,.7] # Oddly, floats-to-colormap worked for a while.
hues = np.random.random((9,3)) #RGB values

# Use this block to generate colored points with a colorbar.
cm = plt.cm.get_cmap('RdYlBu_r')
z = np.random.random((len(r_test), 1))  # RGB values

SC = ax1.scatter(out_test[:,0], #ax1 is a global
            out_test[:,1],
            s=sizes,
            c=z,
            cmap=cm,
            zorder=9) #on top of gridlines

# Colorbar
cbar = plt.colorbar(SC, shrink=1., pad=0.05)
cbar.ax.tick_params(labelsize=8)
cbar.set_label('colorbar', fontsize=8)


plt.show()
编辑
一些整理参数、添加 OP 数据、删除冗余会产生以下图。仍然需要将数据集中在 -90 而不是 0 - 目前这是被黑客攻击的,但我确信 curvelinear_test2() 可以更改以解决它...

编辑 2
在 OP 对这个答案中的中间版本发表评论之后,最终版本如下所示,在帖子的最后给出了情节 - dec 轴上有 -90 和子情节演示
"""
An experimental support for curvilinear grid.
"""
import numpy as np
import  mpl_toolkits.axisartist.angle_helper as angle_helper
import matplotlib.cm as cmap
from matplotlib.projections import PolarAxes
from matplotlib.transforms import Affine2D

from mpl_toolkits.axisartist import SubplotHost

from mpl_toolkits.axisartist import GridHelperCurveLinear


def curvelinear_test2(fig, rect=111):
    """
    polar projection, but in a rectangular box.
    """

    # see demo_curvelinear_grid.py for details
    tr = Affine2D().translate(0,90) + Affine2D().scale(np.pi/180., 1.) + PolarAxes.PolarTransform()

    extreme_finder = angle_helper.ExtremeFinderCycle(10, 60,
                                                     lon_cycle = 360,
                                                     lat_cycle = None,
                                                     lon_minmax = None,
                                                     lat_minmax = (-90, np.inf),
                                                     )

    grid_locator1 = angle_helper.LocatorHMS(12) #changes theta gridline count
    tick_formatter1 = angle_helper.FormatterHMS()

    grid_helper = GridHelperCurveLinear(tr,
                                        extreme_finder=extreme_finder,
                                        grid_locator1=grid_locator1,
                                        tick_formatter1=tick_formatter1
                                        )


    ax1 = SubplotHost(fig, rect, grid_helper=grid_helper)

    # make ticklabels of right and top axis visible.
    ax1.axis["right"].major_ticklabels.set_visible(True)
    ax1.axis["top"].major_ticklabels.set_visible(True)
    ax1.axis["bottom"].major_ticklabels.set_visible(True) #Turn off?
    # let right and bottom axis show ticklabels for 1st coordinate (angle)
    ax1.axis["right"].get_helper().nth_coord_ticks=0
    ax1.axis["bottom"].get_helper().nth_coord_ticks=0


    fig.add_subplot(ax1)

    grid_helper = ax1.get_grid_helper()

    # You may or may not need these - they set the view window explicitly rather than using the
    # default as determined by matplotlib with extreme finder.
    ax1.set_aspect(1.)
    ax1.set_xlim(-4,25) # moves the origin left-right in ax1
    ax1.set_ylim(-3, 30) # moves the origin up-down

    ax1.set_ylabel('Declination')
    ax1.set_xlabel('Ascension')
    ax1.grid(True)
    #ax1.grid(linestyle='--', which='x') # either keyword applies to both
    #ax1.grid(linestyle=':', which='y')  # sets of gridlines

    return ax1,tr


def skip_comments(f):
    '''
    Read lines that DO NOT start with a # symbol.
    '''
    for line in f:
        if not line.strip().startswith('#'):
            yield line

def get_data_bb():
    '''RA, DEC data file.
    '''

    # Path to data file.
    out_file = 'bb_cat.dat'

    # Read data file
    with open(out_file) as f:
        ra, dec = [], []

        for line in skip_comments(f):
            ra.append(float(line.split()[0]))
            dec.append(float(line.split()[1]))

    return ra, dec


import matplotlib.pyplot as plt
fig = plt.figure(1, figsize=(5, 5))
fig.clf()

ax1, tr = curvelinear_test2(fig,121) # tr.transform_point((x, 0)) is always (0,0)
                            # => (theta, r) in but (r, theta) out...

# Read RA, DEC data from file.
ra, dec = get_data_bb()
out_test = tr.transform(zip(ra, dec))

# Use this block to generate colored points with a colorbar.
cm = plt.cm.get_cmap('RdYlBu_r')
z = np.random.random((len(ra), 1))  # RGB values

SC = ax1.scatter(out_test[:,0], #ax1 is a global
            out_test[:,1],
            marker = 'o',
            c=z,
            cmap=cm,
            lw = 0.,
            zorder=9) #on top of gridlines

# Colorbar
cbar = plt.colorbar(SC, shrink=1., pad=0.1)
cbar.ax.tick_params(labelsize=8)
cbar.set_label('colorbar', fontsize=8)

ax2, tr = curvelinear_test2(fig,122) # tr.transform_point((x, 0)) is always (0,0)
                            # => (theta, r) in but (r, theta) out...

# Read RA, DEC data from file.
ra, dec = get_data_bb()
out_test = tr.transform(zip(ra, dec))

# Use this block to generate colored points with a colorbar.
cm = plt.cm.get_cmap('RdYlBu_r')
z = np.random.random((len(ra), 1))  # RGB values

SC = ax2.scatter(out_test[:,0], #ax1 is a global
            out_test[:,1],
            marker = 'o',
            c=z,
            cmap=cm,
            lw = 0.,
            zorder=9) #on top of gridlines

# Colorbar
cbar = plt.colorbar(SC, shrink=1., pad=0.1)
cbar.ax.tick_params(labelsize=8)
cbar.set_label('colorbar', fontsize=8)

plt.show()
最终剧情:

关于python - 使用 python 生成 RA vs DEC 赤道坐标图,我们在Stack Overflow上找到一个类似的问题: https://stackoverflow.com/questions/29525356/