我现在正在编写代码以使用 OpenGL、Cg 和 C++ 实现直接光线转换体积渲染。我的计算机系统是 Win7,我的图形是 nVidia GTX570。
其实我已经成功实现了直接光线转换体积渲染的基本功能,但是现在我想在上面添加光照,我使用的是局部光照模型。添加几行光照代码后,我得到Cg编译错误,添加前运行良好。
我使用的 Cg 配置文件是 CG_PROFILE_VP40 和 CG_PROFILE_FP40。
现在我贴出我的Cg代码:
#define kNumberOfRaySteps 800
// Define interface between the application and the vertex program
struct app_vertex
 {
   float4 Position     : POSITION;
   float4 TexCoord     : TEXCOORD1;
   float4 Color        : COLOR0;
};

// Define the interface between the vertex- and the fragment programs
struct vertex_fragment
 {
   float4 Position    : POSITION; // For the rasterizer
   float4 TexCoord    : TEXCOORD0;
   float4 Color       : TEXCOORD1;
   float4 Pos         : TEXCOORD2;
};

struct fragment_out
{
  float4 Color      : COLOR0;
};

//Blinn-Phong illumination
float3 shading(float3 N, float3 V, float3 L) {
    // material properties
    float3 Ka = float3(0.1, 0.1, 0.1); // ambient
    float3 Kd = float3(0.6, 0.6, 0.6); // diffuse
    float3 Ks = float3(0.2, 0.2, 0.2); // specular
    float n = 100.0; // shininess
    // light properties
    float3 lightColor = float3(1.0, 1.0, 1.0);
    float3 ambientLight = float3(0.3, 0.3, 0.3);
    // Calculate halfway vector
    float3 H= normalize(L + V);
    // Compute ambient term
    float3 ambient = Ka * ambientLight;
    // Compute the diffuse term
    float diffuseLight = max(dot(L, N), 0);
    float3 diffuse = Kd * lightColor * diffuseLight;
    // Compute the specular term
    float specularLight = pow(max(dot(H, N), 0), n);
    if (diffuseLight <= 0) specularLight = 0;
    float3 specular = Ks * lightColor * specularLight;
    return ambient + diffuse + specular;
}

// Raycasting vertex program implementation
vertex_fragment vertex_main( app_vertex IN )
{
  vertex_fragment OUT;

  // Get OpenGL state matrices
  float4x4 ModelView = glstate.matrix.modelview[0];//model view matrix 0
  float4x4 ModelViewProj = glstate.matrix.mvp;//modelview-projection matrix

  // Transform vertex
  OUT.Position = mul( ModelViewProj, IN.Position );
  OUT.Pos =  mul( ModelViewProj, IN.Position );
  OUT.TexCoord = IN.TexCoord;
  OUT.Color = IN.Color;
  return OUT;
}

// Raycasting fragment program implementation
fragment_out fragment_main( vertex_fragment IN,
                            uniform sampler2D tex, //back face
                            uniform sampler2D preint_table,//pre-intergration classification
                            uniform sampler3D volume_tex, //volume data
                            uniform float stepsize,
                            //add local illumination
                            uniform float3 lightPosition,//the external light position
                            uniform float3 eyePosition,//the eye position
                            uniform sampler3D normal_vec//normal vectors
                        )
{
  fragment_out OUT;
  // find the right place to lookup in the backside buffer
  //normalize the spatial position to range [0,1]
  float2 texc = ((IN.Pos.xy / IN.Pos.w) + 1) / 2;
  // the start position of the ray is stored in the texturecoordinate
  float4 start = IN.TexCoord;
  float4 back_position  = tex2D(tex, texc);
  float3 dir = float3(0,0,0);
  dir.x = back_position.x - start.x;
  dir.y = back_position.y - start.y;
  dir.z = back_position.z - start.z;
  // the length from front to back is calculated and used to terminate the ray
  float len = length(dir.xyz);
  float3 norm_dir = normalize(dir);
  float delta = stepsize;
  float3 delta_dir = norm_dir * delta;
  float delta_dir_len = length(delta_dir);
  float3 vec1 = start.xyz;//position of back point
  float3 vec2 = start.xyz;//position of front point
  float4 col_acc = float4(0,0,0,0);
  float alpha_acc = 0;//accumulation of alpha value(opacity)
  float length_acc = 0;
  float4 color_sample;
  float alpha_sample;
  float4 lookup = float4(0.0,0.0,0.0,0.0);
   //set background color to blue
  float4 backgroundColor = float4(1.0,1.0,1.0,0.0);


  //loops:sample points
  for(int i = 0; i < kNumberOfRaySteps; i++)
  {
      vec2 += delta_dir;

      lookup.x = (tex3D(volume_tex,vec1)).x;//scalar value of back point
      lookup.y = (tex3D(volume_tex,vec2)).x;//scalar value of front point
      color_sample = tex2D(preint_table,lookup.xy);
      alpha_sample = color_sample.a;

     //add code for illumination
     float3 N = tex3D(normal_vec,start.xyz).xyz;//normal vector
     //calculate light and viewing directions
     float3 L = normalize(lightPosition - IN.Position.xyz);
     float3 V = normalize(eyePosition - IN.Position.xyz);

      col_acc   += (1.0 - alpha_acc) * color_sample * alpha_sample * 2;

      //add ilumination color
      col_acc += float4(shading(N,V,L),0.0);

      alpha_acc += (1.0 - alpha_acc) * alpha_sample;
      vec1 += delta_dir;//next sample point
      length_acc += delta_dir_len;//accumulation of ray length in the cube
      //change the background color from black to other color
      if(length_acc >= len)
          col_acc += (1.0 - alpha_acc) * backgroundColor;
      // terminate if opacity > 1 or the ray is outside the volume
      if(length_acc >= len || alpha_acc > 0.99) break;
  }

  OUT.Color =  col_acc;

  return OUT;
}
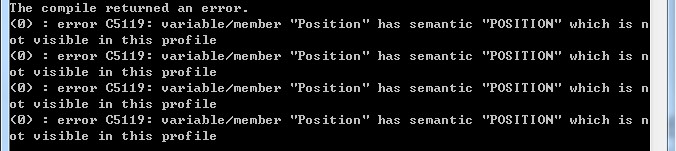
Cg错误信息:
我发现如果我擦掉那条线
col_acc += float4(shading(N,V,L),0.0);
然后程序运行正常,肯定是发不出光照效果了。 所以我猜测计算光照效果的函数shading有问题。
但我想不通。 谁能告诉我如何解决这个问题?
最佳答案
最后,我解决了这个问题。
这个错误的原因是我无法访问片段着色器中的 POSITION 参数,因为顶点着色器的 POSITION 输出仅进入光栅器,并且不是片段着色器。所以我需要将它作为非POSITION参数传递,例如TEXCOORD。在这个程序中,我可以访问参数 Pos 而不是 Position 以获得正确的结果。
不幸的是,没有人回答我。是不是因为用Cg做GPU编程的人不多?我想知道为什么。
关于c++ - 使用 Cg :compile error:semantic "POSITION" not visible in this profile 进行体绘制,我们在Stack Overflow上找到一个类似的问题: https://stackoverflow.com/questions/10202269/