情况: 当文本字段获得焦点并且键盘出现时,文本字段会向上移动,这样它就不会被键盘覆盖。
要实现此目的,一种解决方案是添加一个监听 UIResponder.keyboardWillShowNotification 的观察者。
NotificationCenter.default.addObserver(
    self,
    selector: #selector(keyboardWillShow(_:)),
    name: UIResponder.keyboardWillShowNotification,
    object: nil)
当通知到来时,我们更改 ScrollView 的 contentInset 属性:
@objc func keyboardWillShow(_ notification: Notification) {
    if let info = notification.userInfo, let value = info[UIResponder.keyboardFrameEndUserInfoKey] as? NSValue {
        scrollView.contentInset = UIEdgeInsets(top: 0, left: 0, bottom: value.cgRectValue.height, right: 0)
    }
}
它工作得很好,但我不明白为什么它能工作。更改上面的 contentInset 会向底部添加填充,但内容 View 的原点不会更改,因此内容 View 不应向上移动。
如果我将以下代码放入按钮点击事件中,则当我点击按钮时,即使底部添加了填充, View 也不会移动。
scrollView.contentInset = UIEdgeInsets(top: 0, left: 0, bottom: 300, right: 0)
为什么第一个案例会向上移动 View ,而第二个案例不会?
最佳答案
简而言之 - 设置 .contentInset 不会自动更改 .contentOffset。
如果您将按钮更改为:
scrollView.contentInset = UIEdgeInsets(top: 0, left: 0, bottom: 300, right: 0)
scrollView.contentOffset.y = 300.0
您将看到内容向上移动。
当键盘出现时,IT会更改 ScrollView 的.contentOffset - 如果可以的话。设置插入底部允许键盘执行此操作。
还有更多信息,如果您有兴趣...
UIScrollView 的 .contentInset 属性告诉 UIKit 它可以相对于其 .contentSize 滚动多少。一般来说,现在设置 .contentSize 的正确方法是将 ScrollView 的 subview 限制为 .contentLayoutGuide 并让自动布局处理它。
那么,让我们看一个简单的例子......
我们将使用 ScrollView ,添加一个占据 ScrollView 高度 80% 的标签,然后在标签下方添加一个文本字段:
class ScrollExampleViewController: UIViewController {

    let scrollView = UIScrollView()

    override func viewDidLoad() {
        super.viewDidLoad()

        view.backgroundColor = UIColor(white: 0.95, alpha: 1.0)

        // we'll add a label to the scroll view that will take up
        //  80% of the height, so the text field will be near the bottom
        let label = UILabel()
        label.backgroundColor = .cyan
        label.font = .systemFont(ofSize: 36, weight: .regular)
        label.textAlignment = .center
        label.numberOfLines = 0
        label.text = "This label will take up 80% of the scroll view height.\n\nSo our text field will be near the bottom of the scroll view and will be covered by the keyboard."

        // add a text field setup to end editing (dismiss the keyboard) when Enter is tapped
        let textField = UITextField(frame: .zero, primaryAction: UIAction(title: "") { action in
            self.view.endEditing(true)
        })

        [label, textField, scrollView].forEach { v in
            v.translatesAutoresizingMaskIntoConstraints = false
        }

        scrollView.addSubview(label)
        scrollView.addSubview(textField)
        view.addSubview(scrollView)

        let g = view.safeAreaLayoutGuide
        let cg = scrollView.contentLayoutGuide
        let fg = scrollView.frameLayoutGuide

        NSLayoutConstraint.activate([

            // inset the scroll view 20-points on all 4 sides
            scrollView.topAnchor.constraint(equalTo: g.topAnchor, constant: 20.0),
            scrollView.leadingAnchor.constraint(equalTo: g.leadingAnchor, constant: 20.0),
            scrollView.trailingAnchor.constraint(equalTo: g.trailingAnchor, constant: -20.0),
            scrollView.bottomAnchor.constraint(equalTo: g.bottomAnchor, constant: -20.0),

            // constrain label top/leading/trailing to Content Layout Guide
            //  with 8-points "padding"
            label.topAnchor.constraint(equalTo: cg.topAnchor, constant: 8.0),
            label.leadingAnchor.constraint(equalTo: cg.leadingAnchor, constant: 8.0),
            label.trailingAnchor.constraint(equalTo: cg.trailingAnchor, constant: -8.0),

            // height 80% of scroll view Frame Layout Guide height
            label.heightAnchor.constraint(equalTo: fg.heightAnchor, multiplier: 0.8),

            // width equal to scroll view Frame Layout Guide width
            //  minus 16-points (8 on each side)
            label.widthAnchor.constraint(equalTo: fg.widthAnchor, constant: -16.0),

            // constrain text field Top to label Bottom plus 20-points
            textField.topAnchor.constraint(equalTo: label.bottomAnchor, constant: 20.0),

            // constrain text field leading to Content Layout Guide
            //  with 20-points "padding
            textField.leadingAnchor.constraint(equalTo: cg.leadingAnchor, constant: 20.0),

            // make text field width 40-points less than scroll view width
            textField.widthAnchor.constraint(equalTo: fg.widthAnchor, constant: -40.0),

            // constrain text field bottom to Content Layout Guide
            //  with 20-points "padding
            textField.bottomAnchor.constraint(equalTo: cg.bottomAnchor, constant: -20.0),

        ])

        // so we can see the framing
        scrollView.backgroundColor = .red
        textField.borderStyle = .roundedRect
        textField.backgroundColor = .yellow

    }

}
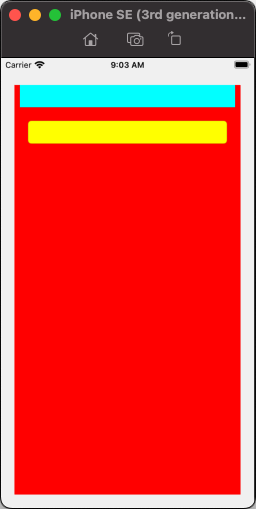
它看起来像这样:

而且我们无法滚动,因为内容高度比 ScrollView 高度短。
如果我们点击文本字段,键盘将显示并覆盖文本字段:

如果我们在 viewDidLoad() 的末尾添加这一行:
// set content inset bottom to 500
scrollView.contentInset = .init(top: 0.0, left: 0.0, bottom: 500.0, right: 0.0)
它不会更改 ScrollView 的当前.contentOffset,但我们现在可以向上滚动到这一点:
但这并不完全是我们想要的。首先,我们可能不希望用户能够像这样滚动......其次,当我们点击文本字段时,它会“自动滚动”到:

所以,让我们删除该行,并改为实现通知观察。
将其添加到 viewDidLoad() 的末尾:
    // add observer for keyboard will show notification
    NotificationCenter.default.addObserver(
        self,
        selector: #selector(keyboardWillShow(_:)),
        name: UIResponder.keyboardWillShowNotification,
        object: nil)
并添加处理程序:
@objc func keyboardWillShow(_ notification: Notification) {
    if let info = notification.userInfo, let value = info[UIResponder.keyboardFrameEndUserInfoKey] as? NSValue {
        // add Bottom content inset, so UIKit can scroll the text field up
        scrollView.contentInset = UIEdgeInsets(top: 0, left: 0, bottom: value.cgRectValue.height, right: 0)
    }
}
启动时一切看起来都一样(我们无法向上或向下滚动),但是当我们点击文本字段时:

键盘出现,.contentInset 底部已设置,字段自动滚动到我们想要的位置。
但请注意...如果我们停止编辑(点击 Return 键),我们会看到以下内容:

因为 .contentInset.bottom 仍然设置。
因此,我们还希望在键盘关闭时采取行动来“重置”插图。
将此添加到viewDidLoad():
    // add observer for keyboard will hide notification
    NotificationCenter.default.addObserver(
        self,
        selector: #selector(keyboardWillHide(_:)),
        name: UIResponder.keyboardWillHideNotification,
        object: nil)
和一个“将隐藏”处理程序:
@objc func keyboardWillHide(_ notification: Notification) {
    scrollView.contentInset = .zero
}
现在,当键盘关闭时, ScrollView 会自动滚动回其原始位置。
还有一些其他事情需要记住 - 从 ScrollView 的实际框架开始。
让我们缩短 ScrollView (但文本字段仍然会被键盘隐藏):

无需更改任何其他代码,点击文本字段即可得到:

我们需要做的是检查键盘顶部与 ScrollView 底部相比的位置,并相应地调整插图。
让我们将“将显示”处理程序更改为:
@objc func keyboardWillShow(_ notification: Notification) {
    if let info = notification.userInfo, let value = info[UIResponder.keyboardFrameEndUserInfoKey] as? NSValue {
        let kbTop = value.cgRectValue.minY
        let svBot = scrollView.frame.maxY
        // add 8-points so the text field is not sitting directly on the keyboard
        let h = (svBot - kbTop) + 8.0
        scrollView.contentInset = UIEdgeInsets(top: 0, left: 0, bottom: h, right: 0)
    }
}
结果:

还有很多关于如何处理键盘外观的其他信息 - 值得搜索和阅读。
不过,希望这已经解释了设置 .contentInset 的工作原理。
关于uiscrollview - UIScrollView.contentInset 如何向上滚动内容 View ?,我们在Stack Overflow上找到一个类似的问题: https://stackoverflow.com/questions/75736953/