我已经下载了支持 java 12 的 netbeans 11
所以我按照 Gluon 网页的步骤运行 JavaFX 和 Netbeans Non modules with maven > https://openjfx.io/openjfx-docs/#next-steps
我已按照说明中的说明配置了运行此应用程序的操作。
运行项目
清理javafx:运行
但是没有指定调试项目。
有没有办法调试这个 javaFX 项目?
<project xmlns="http://maven.apache.org/POM/4.0.0" xmlns:xsi="http://www.w3.org/2001/XMLSchema-instance"
  xsi:schemaLocation="http://maven.apache.org/POM/4.0.0 http://maven.apache.org/maven-v4_0_0.xsd">
    <modelVersion>4.0.0</modelVersion>
    <groupId>com.mycompany</groupId>
    <artifactId>SimonSaysGFX</artifactId>
    <version>1.0.0-SNAPSHOT</version>
    <properties>
        <project.build.sourceEncoding>UTF-8</project.build.sourceEncoding>
        <maven.compiler.source>12</maven.compiler.source>
        <maven.compiler.target>12</maven.compiler.target>
    </properties>
    <dependencies>
        <dependency>
            <groupId>org.openjfx</groupId>
            <artifactId>javafx-controls</artifactId>
            <version>12.0.1</version>
        </dependency>
        <dependency>
            <groupId>org.openjfx</groupId>
            <artifactId>javafx-media</artifactId>
            <version>12.0.1</version>
        </dependency>
        <dependency>
            <groupId>org.openjfx</groupId>
            <artifactId>javafx-fxml</artifactId>
            <version>12.0.1</version>
        </dependency>
    </dependencies>
    <build>
        <plugins>
            <plugin>
                <groupId>org.apache.maven.plugins</groupId>
                <artifactId>maven-compiler-plugin</artifactId>
                <version>3.8.0</version>
                <configuration>
                    <release>12</release>
                </configuration>
            </plugin>
            <plugin>
                <groupId>org.openjfx</groupId>
                <artifactId>javafx-maven-plugin</artifactId>
                <version>0.0.2</version>
                <configuration>
                    <mainClass>com.mycompany.simonsaysgfx.App</mainClass>
                </configuration>
            </plugin>
        </plugins>
    </build>
    <name>SimonSaysGFX</name>
</project>
最佳答案
如果您看到 documentation的javafx-maven-plugin ,您可以将一些 VM 参数添加到 run目标,以便在 NetBeans 中调试您的项目。
但是,为了保持通常的 run目标准备只运行项目而不是调试,无需注释掉添加的选项,我们可以向插件添加第二次执行。
像这样修改你的插件:
<plugin>
    <groupId>org.openjfx</groupId>
    <artifactId>javafx-maven-plugin</artifactId>
    <version>0.0.2</version>
    <executions>
        <execution>
            <!-- Default configuration for running -->
            <id>default-cli</id>
            <configuration>
                <mainClass>com.mycompany.simonsaysgfx.App</mainClass>
            </configuration>
        </execution>
        <execution>
            <!-- Configuration for debugging -->
            <id>debug</id>
            <configuration>
                <options>
                    <option>-agentlib:jdwp=transport=dt_socket,server=y,suspend=y,address=*:8000</option>
                </options>
                <mainClass>com.mycompany.simonsaysgfx.App</mainClass>
            </configuration>
        </execution>
    </executions>
</plugin>
现在您可以从命令行运行:
mvn clean javafx:run
像往常一样运行您的应用程序,并且:
mvn clean javafx:run@debug
启动 Debug模式。然后你会看到类似的东西:
[INFO] --- javafx-maven-plugin:0.0.2:run (debug) @ Project ---
[INFO] Using 'UTF-8' encoding to copy filtered resources.
[INFO] Copying 1 resource
[INFO] Changes detected - recompiling the module!
[INFO] Compiling 3 source files to /path/to/project/target/classes
Listening for transport dt_socket at address: 8000
此时,您需要设置断点并从
NetBeans -> Debug -> Attach Debugger 附加调试器到端口 8000: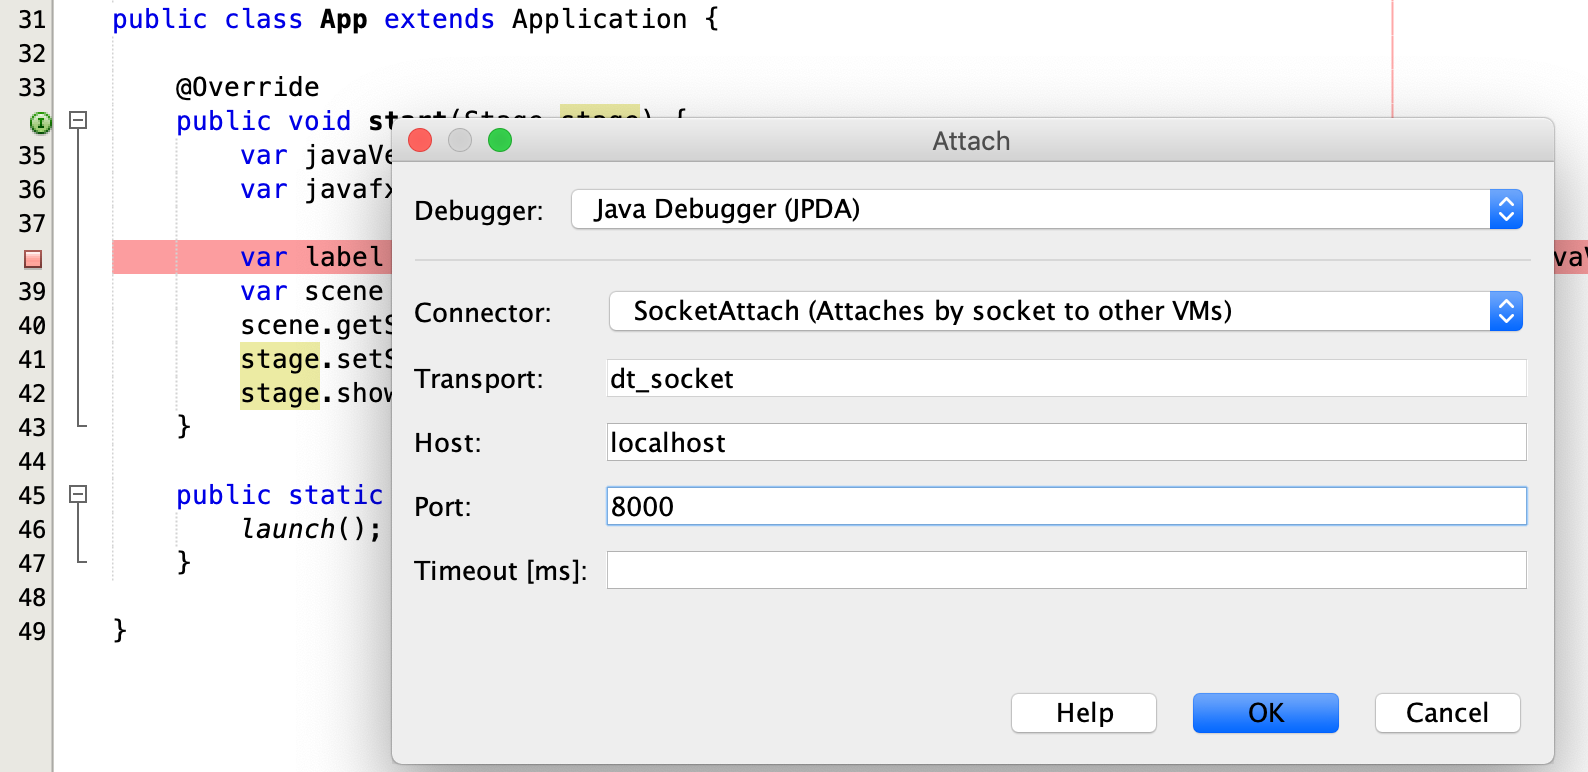
单击确定,您将能够调试您的项目。
请注意,您还可以定义自定义 NetBeans 操作以使用“运行”和“调试”按钮。添加
nbactions.xml使用以下两个操作将文件添加到项目的根目录:<?xml version="1.0" encoding="UTF-8"?>
<actions>
<action>
<actionName>run</actionName>
<goals>
<goal>clean</goal>
<goal>javafx:run</goal>
</goals>
</action>
<action>
<actionName>jlink</actionName>
<goals>
<goal>clean</goal>
<goal>javafx:jlink</goal>
</goals>
</action>
<action>
<actionName>debug</actionName>
<goals>
<goal>clean</goal>
<goal>javafx:run@debug</goal>
</goals>
</action>
</actions>
现在您可以使用 NetBeans 运行和调试按钮。
关于javafx - 我无法使用带有 JavaFX 12 的 netbeans 11 调试应用程序,我们在Stack Overflow上找到一个类似的问题: https://stackoverflow.com/questions/56197372/