如何使我的按钮看起来更像 float 操作按钮?
到目前为止,我的按钮看起来很接近,但看起来还不一样。您还建议进行哪些其他更改?
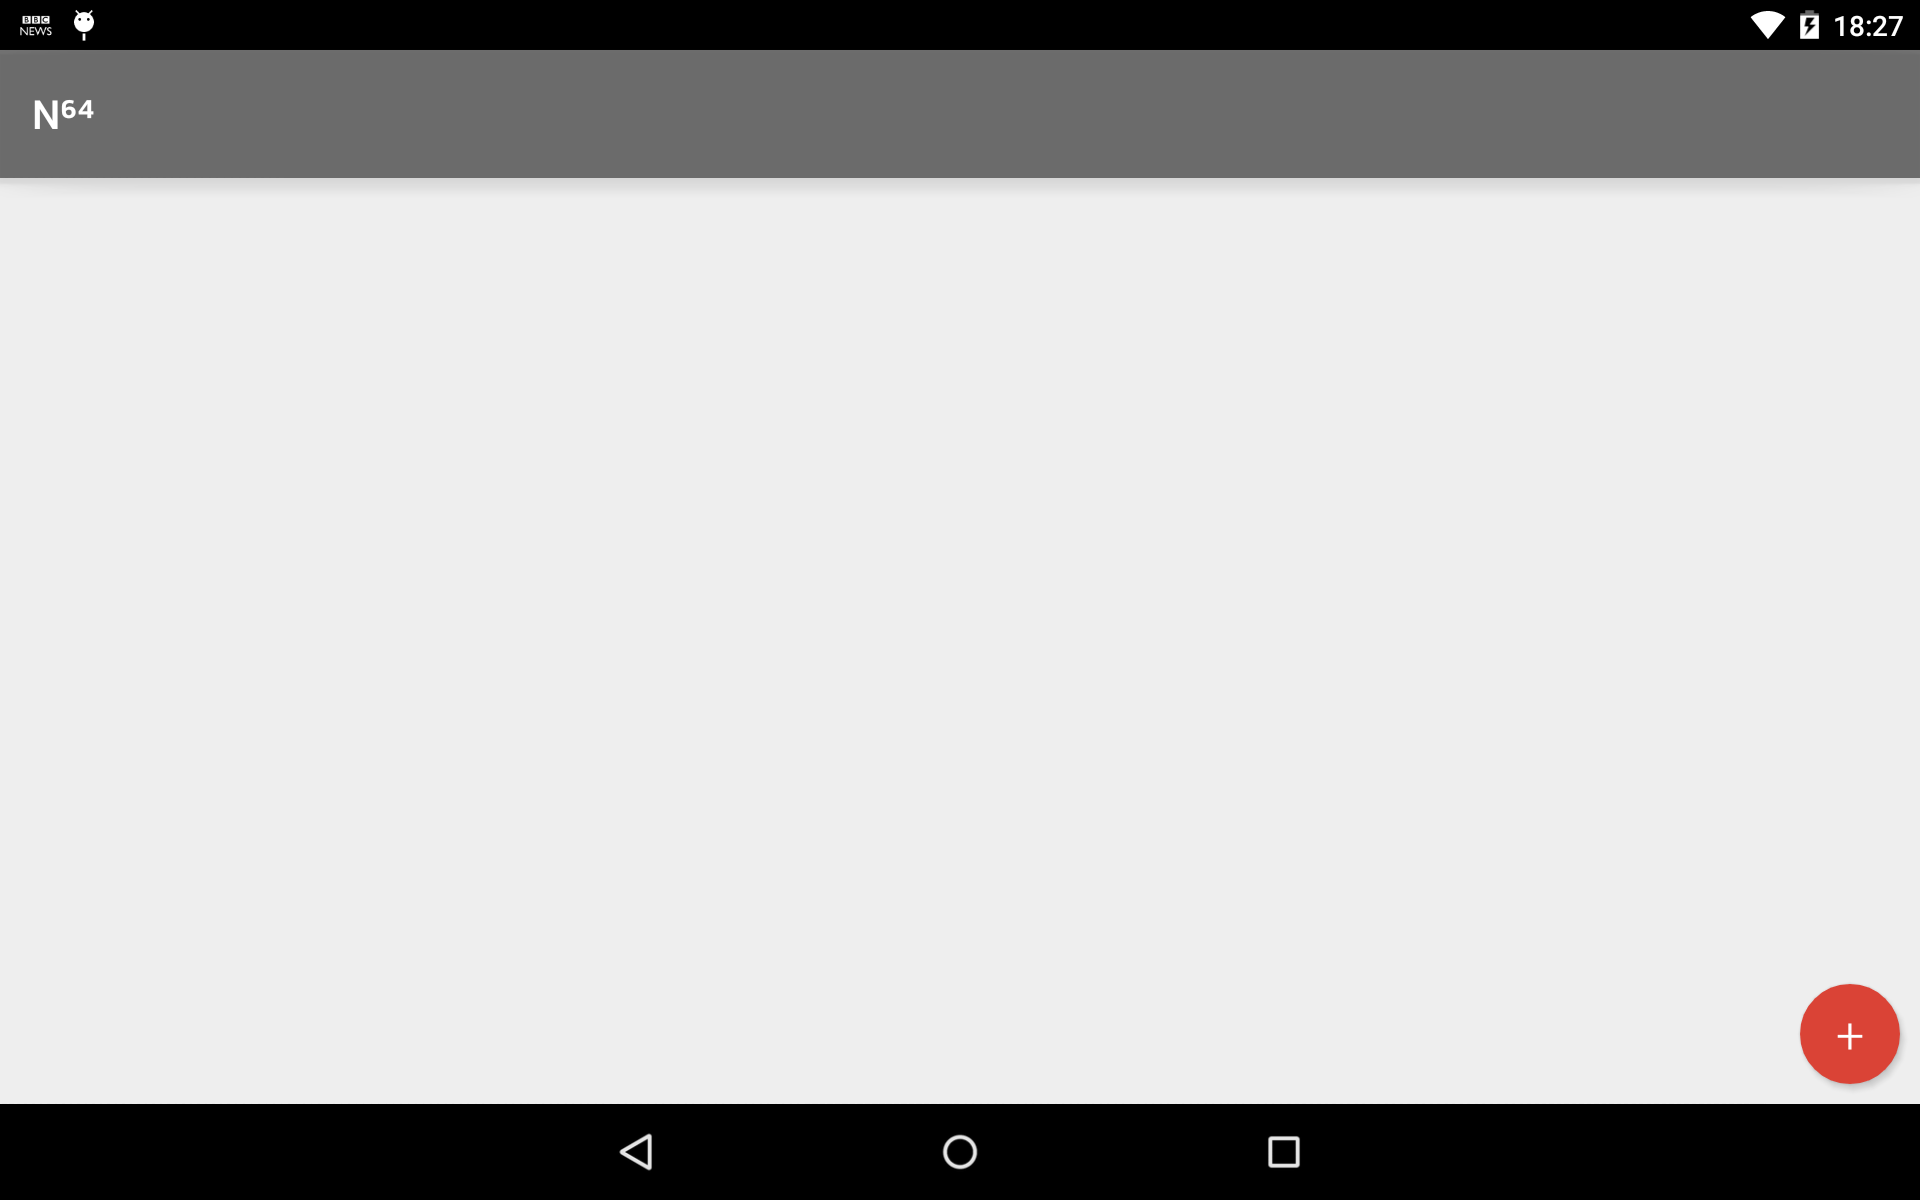
下面是 float 操作按钮的图像,以及到目前为止我的按钮和代码的图像
实际 float 操作按钮的图片如下:
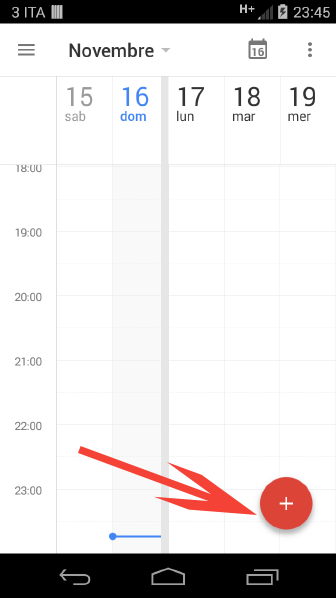
到目前为止,我的实际 Button 图像如下:

我的 API 是 v19
代码:
实际按钮的代码
 <Button
        android:layout_width="wrap_content"
        android:layout_height="60dp"
        android:text="+"
        android:textSize="60sp"
        android:background="@drawable/addbutton"
        android:elevation="3dp"
        android:layout_marginTop="215dp"
        android:layout_marginLeft="310dp"
        android:fontFamily="sans-serif-light"
        android:gravity="center"
        android:textColor="#ffff" />
Addbutton.xml
<?xml version="1.0" encoding="utf-8"?>
<layer-list xmlns:android="http://schemas.android.com/apk/res/android">
    <item>
        <layer-list>
            <item>
                <shape android:shape="oval">
                    <solid android:color="#08000000"/>
                    <padding
                        android:bottom="3px"
                        android:left="3px"
                        android:right="3px"
                        android:top="3px"
                        />
                </shape>
            </item>
            <item>
                <shape android:shape="oval">
                    <solid android:color="#09000000"/>
                    <padding
                        android:bottom="2px"
                        android:left="2px"
                        android:right="2px"
                        android:top="2px"
                        />
                </shape>
            </item>
            <item>
                <shape android:shape="oval">
                    <solid android:color="#10000000"/>
                    <padding
                        android:bottom="2px"
                        android:left="2px"
                        android:right="2px"
                        android:top="2px"
                        />
                </shape>
            </item>
            <item>
                <shape android:shape="oval">
                    <solid android:color="#11000000"/>
                    <padding
                        android:bottom="1px"
                        android:left="1px"
                        android:right="1px"
                        android:top="1px"
                        />
                </shape>
            </item>
            <item>
                <shape android:shape="oval">
                    <solid android:color="#12000000"/>
                    <padding
                        android:bottom="1px"
                        android:left="1px"
                        android:right="1px"
                        android:top="1px"
                        />
                </shape>
            </item>
            <item>
                <shape android:shape="oval">
                    <solid android:color="#13000000"/>
                    <padding
                        android:bottom="1px"
                        android:left="1px"
                        android:right="1px"
                        android:top="1px"
                        />
                </shape>
            </item>
            <item>
                <shape android:shape="oval">
                    <solid android:color="#14000000"/>
                    <padding
                        android:bottom="1px"
                        android:left="1px"
                        android:right="1px"
                        android:top="1px"
                        />
                </shape>
            </item>
            <item>
                <shape android:shape="oval">
                    <solid android:color="#15000000"/>
                    <padding
                        android:bottom="1px"
                        android:left="1px"
                        android:right="1px"
                        android:top="1px"
                        />
                </shape>
            </item>
            <item>
                <shape android:shape="oval">
                    <solid android:color="#16000000"/>
                    <padding
                        android:bottom="1px"
                        android:left="1px"
                        android:right="1px"
                        android:top="1px"
                        />
                </shape>
            </item>
            <item>
                <shape android:shape="oval">
                    <solid android:color="#17000000"/>
                    <padding
                        android:bottom="1px"
                        android:left="1px"
                        android:right="1px"
                        android:top="1px"
                        />
                </shape>
            </item>
        </layer-list>
    </item>
    <item>
        <shape android:shape="oval">
            <solid android:color="#FF4186"/>
        </shape>
    </item>
</layer-list>
最佳答案
结果:
布局中的按钮:
<LinearLayout
    xmlns:android="http://schemas.android.com/apk/res/android"
    android:layout_width="match_parent"
    android:layout_height="match_parent">
    ...

    <RelativeLayout
        xmlns:tools="http://schemas.android.com/tools"
        android:layout_width="match_parent"
        android:layout_height="match_parent"
        android:gravity="bottom|end">
        <Button
            android:id="@+id/add_button"
            android:layout_width="50dp"
            android:layout_height="50dp"
            android:layout_margin="10dp"
            android:background="@drawable/add_button_selector"
            android:gravity="center"
            android:stateListAnimator="@null"
            android:text="+"
            android:textSize="25sp"
            android:elevation="3dp"
            android:fontFamily="sans-serif-light"
            android:textColor="#FFF"
            tools:ignore="HardcodedText,UnusedAttribute"/>
    </RelativeLayout>
</LinearLayout>
说明:
- RelativeLayout,覆盖所有内容并将按钮放在右下角。
margin为海拔提供一些空间gravity使背景可绘制对象和文本居中stateListAnimator设置为 null,这样它就不会与海拔混淆(它可以通过这个动画)
res/drawables-v21/add_button_selector.xml
<ripple
    xmlns:android="http://schemas.android.com/apk/res/android"
    android:color="#b0372c">
    <item>
        <shape android:shape="oval">
            <solid android:color="#da4336" />
        </shape>
    </item>
</ripple>
res/drawables/add_button_selector.xml:
<selector xmlns:android="http://schemas.android.com/apk/res/android">
    <item android:state_selected="true" android:drawable="@drawable/add_button_selected"/>
    <item android:state_pressed="true" android:drawable="@drawable/add_button_selected"/>
    <item android:drawable="@drawable/add_button"/>
</selector>
res/drawables/add_button.xml:
<shape
    xmlns:android="http://schemas.android.com/apk/res/android"
    android:shape="oval">
    <solid android:color="#da4336" />
</shape>
res/drawables/add_button_selected.xml:
<shape
    xmlns:android="http://schemas.android.com/apk/res/android"
    android:shape="oval">
    <solid android:color="#b0372c" />
</shape>
说明:
- 从 API 21 开始,您可以使用涟漪效应:
- 但是对于旧版本,您必须坚持使用旧的颜色选择器
注意事项
- 可能有一个用户为较低 API 制作的波纹库,可能值得一试
- 较低的 API 可能需要使用阴影和/或自定义可绘制对象而不是高程,由于我没有合适的设备,因此尚未测试
关于android - 如何使我的按钮看起来更像 Android JellyBean (v21) 中的 float 操作按钮?,我们在Stack Overflow上找到一个类似的问题: https://stackoverflow.com/questions/27985466/