我正在使用 C++ 和 OpenGL 3.2 以及 SFML 开发 3D 游戏。我一直在努力实现点光阴影贴图。到目前为止我所做的似乎符合我所学的和我看到的例子,但仍然没有影子。
我所做的是按照我使用它的确切顺序编写我使用的所有代码的简单列表,但不是完整的源代码,只有相关的代码(因为我的项目分为几个类):
Omnidirectional shadow mapping


C++
- Initialization
-- Use shadow pass shader program
-- Generate + bind the shadow frame buffer
glGenFramebuffers(1, &shadowFrameBuffer);
glBindFramebuffer(GL_FRAMEBUFFER, shadowFrameBuffer);


-- Generate a texture
glGenTextures(1, &shadowMap);

-- Bind texture as cubemap
glBindTexture(GL_TEXTURE_CUBE_MAP);

-- Set texture parameters
glTexParameteri(GL_TEXTURE_CUBE_MAP, GL_TEXTURE_WRAP_S, GL_CLAMP_TO_EDGE);
glTexParameteri(GL_TEXTURE_CUBE_MAP, GL_TEXTURE_WRAP_T, GL_CLAMP_TO_EDGE);
glTexParameteri(GL_TEXTURE_CUBE_MAP, GL_TEXTURE_WRAP_R, GL_CLAMP_TO_EDGE);
glTexParameteri(GL_TEXTURE_CUBE_MAP, GL_TEXTURE_MIN_FILTER, GL_LINEAR);
glTexParameteri(GL_TEXTURE_CUBE_MAP, GL_TEXTURE_MAG_FILTER, GL_LINEAR);

-- Generate empty 1024 x 1024 for every face of the cube
for (int face = 0; face < 6; face++)
        glTexImage2D(GL_TEXTURE_CUBE_MAP_POSITIVE_X + face, 0, GL_DEPTH_COMPONENT32F , 1024, 1024, 0, GL_DEPTH_COMPONENT, GL_FLOAT, NULL);

-- Attach the cubemap to the framebuffer
glFramebufferTexture(GL_FRAMEBUFFER, GL_DEPTH_ATTACHMENT, shadowMap, 0);

-- Only draw depth to framebuffer
glDrawBuffer(GL_NONE);

- Every frame
-- Clear screen
glClearColor(0.0f, 0.0f, 0.0f, 1.0f);
glClear(GL_COLOR_BUFFER_BIT | GL_DEPTH_BUFFER_BIT);

-- Render shadow map
--- Bind shadow frame buffer
glBindFramebuffer(GL_FRAMEBUFFER, shadowFrameBuffer);

--- Set the viewport to the size of the shadow map
glViewport(0, 0, 1024, 1024);

-- Cull front faces
glCullFace(GL_FRONT);

-- Use shadow mapping program
--- Define projection matrix for rendering each face
glm::mat4 depthProjectionMatrix = glm::perspective(90.0f, 1.0f, 1.0f, 10.0f);

--- Define view matrices for all six faces
std::vector<glm::mat4> depthViewMatrices;

depthViewMatrices.push_back(glm::lookAt(lightInvDir, glm::vec3(1,0,0),  glm::vec3(0,-1,0) )); // +X
depthViewMatrices.push_back(glm::lookAt(lightInvDir, glm::vec3(-1,0,0), glm::vec3(0,1,0) )); // -X
depthViewMatrices.push_back(glm::lookAt(lightInvDir, glm::vec3(0,1,0),  glm::vec3(0,0,1)  )); // +Y
depthViewMatrices.push_back(glm::lookAt(lightInvDir, glm::vec3(0,-1,0), glm::vec3(0,0,-1) )); // -Y
depthViewMatrices.push_back(glm::lookAt(lightInvDir, glm::vec3(0,0,1),  glm::vec3(0,-1,0) )); // +Z
depthViewMatrices.push_back(glm::lookAt(lightInvDir, glm::vec3(0,0,-1), glm::vec3(0,1,0)  )); // -Z

--- For every object in the scene
---- Bind the VBO of the object
---- Define the model matrix for the object based on its position and orientation
---- For all six sides of the cube
----- Set the correct side to render to
glFramebufferTexture2D(GL_FRAMEBUFFER, GL_DEPTH_ATTACHMENT, GL_TEXTURE_CUBE_MAP_POSITIVE_X + i, shadowMap, 0);

----- Clear depth buffer
glClear(GL_DEPTH_BUFFER_BIT);

----- Send model, view and projection matrices to shadow mapping shader
glUniformMatrix4fv(glGetUniformLocation(shadowMapper, "lightModelMatrix"), 1, GL_FALSE, glm::value_ptr(depthModelMatrix));
glUniformMatrix4fv(glGetUniformLocation(shadowMapper, "lightViewMatrix"), 1, GL_FALSE, glm::value_ptr(depthViewMatrices[i]));
glUniformMatrix4fv(glGetUniformLocation(shadowMapper, "lightProjectionMatrix"), 1, GL_FALSE, glm::value_ptr(depthProjectionMatrix));

----- Draw the object
glDrawElements(....);
- END SHADOW MAP DRAW
-- Cull back faces
glCullFace(GL_BACK);

-- Use standard shader program
-- Bind default framebuffer
glBindFramebuffer(GL_FRAMEBUFFER, 0);

-- Activate cubemap texture
glActiveTexture(GL_TEXTURE1);

-- Bind cubemap texture
glBindTexture(GL_TEXTURE_CUBE_MAP, shadowMap);

-- Tell shader to use first texture
glUniform1i(glGetUniformLocation(currentProgram->id, "shadowmap"), 1);

-- Send standard MVPs and draw objects
glDrawElements(...);

- END C++

=================================
GLSL

shadowpass vertex shader source

#version 150

in vec3 position;
out vec3 worldPosition;

uniform mat4 lightModelMatrix;
uniform mat4 lightViewMatrix;
uniform mat4 lightProjectionMatrix;

void main()
{
    gl_Position = lightProjectionMatrix * lightViewMatrix * lightModelMatrix * vec4(position, 1.0);
    worldPosition = (lightModelMatrix * vec4(position, 1.0)).xyz; // Send world position of vertex to fragment shader
}


shadowpass fragment shader source

#version 150

in vec3 worldPosition; // Vertex position in world space
out float distance; // Distance from vertex position to light position
vec3 lightWorldPosition = vec3(0.0, 0.0, 0.0); // Light position in world space

void main()
{
    distance = length(worldPosition - lightWorldPosition); // Distance from point to light
    // Distance will be written to the cubemap
}

standard vertex shader source

#version 150

in vec3 position;
in vec3 normal;
in vec2 texcoord;

uniform mat4 modelMatrix;
uniform mat4 viewMatrix;
uniform mat4 projectionMatrix;

out vec3 fragnormal;
out vec3 fragnormaldirection;
out vec2 fragtexcoord;
out vec4 fragposition;
out vec4 fragshadowcoord;

void main()
{
    fragposition = vec4(position, 1.0); // Position of vertex in object space
    fragtexcoord = texcoord;
    fragnormaldirection = normalize(modelInverseTranspose * normal);
    fragnormal = normalize(normal);


    gl_Position = projectionMatrix * viewMatrix * modelMatrix * vec4(position, 1.0);
}

standard fragment shader source

#version 150

out vec4 outColour;

in vec3 fragnormaldirection;
in vec2 fragtexcoord;
in vec3 fragnormal;
in vec4 fragposition;

uniform mat4 modelMatrix;
uniform mat4 viewMatrix;
uniform mat4 projectionMatrix;
uniform mat4 viewMatrixInversed;

uniform sampler2D tex;
uniform samplerCube shadowmap;

void main()
{
    vec3 lightpos = vec3(0.0, 0.0, 0.0);

    vec3 pointToLight = (fragposition * modelMatrix).xyz - lightpos; // Get vector between this point and the light

    float dist = texture(shadowmap, pointToLight).x; // Get distance written in texture

    float shadowfactor = 1.0;

    if (length(pointToLight) > dist) // Is it occluded?
        shadowfactor = 0.5;

    outColour = texture(tex, fragtexcoord) * shadowfactor;
}
这是我的代码现在执行的操作的图片:
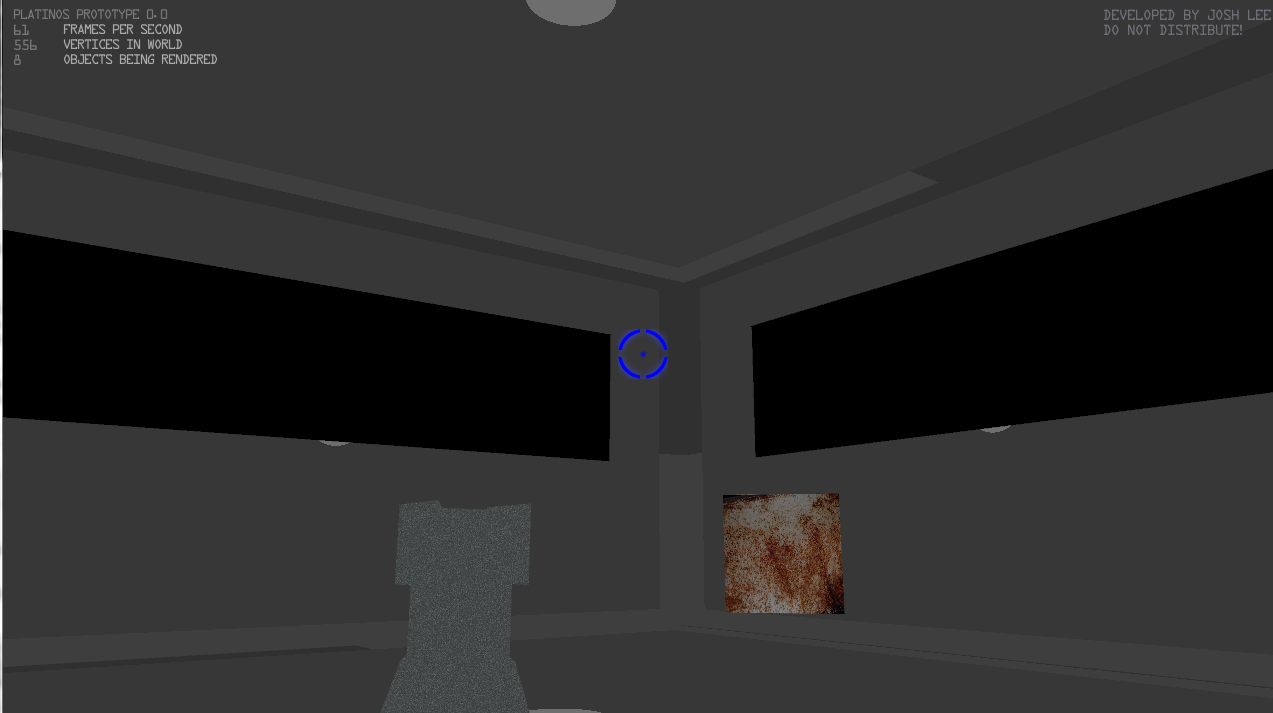
这是一个奇怪的效果,但似乎接近我的意思。似乎任何暴露在 0, 0, 0 光下的表面在其中心都有一个无阴影的圆圈,而其他一切都没有阴影。
最佳答案
调试阴影贴图的一种非常有用的方法确实有一种方法可以在屏幕上将阴影贴图的内容显示为四边形。在立方体阴影贴图的情况下有 6 个四边形。这可以作为一个调试彩蛋来实现,您可以在整个屏幕上显示完整的纹理并“转到下一张脸”,这样您就可以使用另一个组合键滑动 6 个面。
然后,立方阴影贴图中最重要的事情之一就是深度范围。点光源没有无限范围,因此通常您希望缩放深度存储以匹配光照范围。
您可以使用浮点 16 位亮度(或红色 channel )纹理来存储世界深度(球形,意味着在像素着色器中使用一点计算的真实长度(光线到交叉点)) 或者你可以使用线性深度(与存储在经典 ZBuffer 中的相同类型,它是归一化设备坐标的深度。即投影矩阵后的深度。在这种情况下,在光照中重建一次世界位置着色器(下一个 channel ),问题是在乘以相机立方体面逆 View *投影后一定要除以 w。
调试阴影贴图的关键在于着色器的调整。首先使用颜色来可视化存储在阴影贴图中的深度,如世界像素所感知的那样。这是唯一有助于在我公司的引擎中修复点阴影贴图的方法。您可以使用 mix 和 clamp 的组合来制作颜色代码,例如蓝色从 0 到 0.3,红色从 0.3 到 0.6,绿色从 0.6 到 1。如果您有世界距离存储,它会更容易,但通过它来可视化仍然很有趣颜色代码。只需使用相同的函数,但将距离除以您预期的世界范围。
使用该 vizu 方案,您将能够立即看到阴影区域,因为它们都具有相同的颜色(因为“光线”被更近的表面截获)。一旦达到这一点;剩下的一切都会顺利进行。
祝你好运:)
关于c++ - 奇怪的 OpenGL 阴影映射行为,我们在Stack Overflow上找到一个类似的问题: https://stackoverflow.com/questions/14287674/