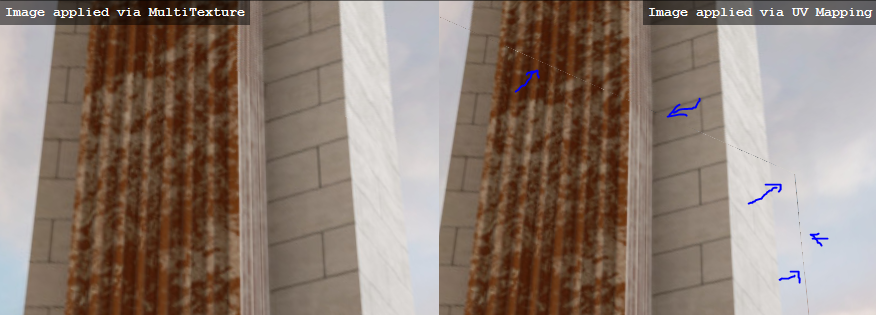
我已成功通过 UV 映射将图像纹理应用到立方体(以生成照片球查看器)。尽管纹理与立方体面完美对齐,但面连接处的线可见为细直线。
如果纹理图 block 通过 Canvas 分割并通过 MultiMaterial 应用于立方体,则不会发生同样的问题。
下图比较了两种应用纹理方法的结果(点击查看大图):
实例可以在 CodePen.io 找到
用于纹理的图像可以找到 here
这是执行 UV 映射的代码(非常简单):
function mapCubeUV(geometry, cubeH) {

  // converting all vertices into polar coordinates
  geometry.faceVertexUvs[0] = []; // This clears out any UV mapping that may have already existed on the object

  // walking through all the faces defined by the object
  // ... we need to define a UV map for each of them
  geometry.faces.forEach(function(face) {

    var uvs = [];

    var ids = [ 'a', 'b', 'c'],
        faceSign = face.normal.x+'.'+face.normal.y+'.'+face.normal.z;

    for( var i = 0; i < ids.length; i++ ) {

      // using the point to access the vertice
      var vertexIndex = face[ ids[ i ] ],
          vertex = geometry.vertices[ vertexIndex ],
          tileIx,
          uvY, uvX;

      // face order in the image: West, East, Up, Down, South, North
      switch(faceSign) {
        case '1.0.0': // West
          uvY = vertex.y;
          uvX = -vertex.z;
          tileIx = 0;
          break;
        case '-1.0.0': // East
          uvY = vertex.y;
          uvX = vertex.z;
          tileIx = 1;
          break;
        case '0.1.0': // Up
          uvY = -vertex.z;
          uvX = vertex.x;
          tileIx = 2;
          break;
        case '0.-1.0': // Down
          uvY = vertex.z;
          uvX = vertex.x;
          tileIx = 3;
          break;
        case '0.0.1': // South
          uvY = vertex.y;
          uvX = vertex.x;
          tileIx = 4;
          break;
        case '0.0.-1': // North
          uvY = vertex.y;
          uvX = -vertex.x;
          tileIx = 5;
          break;
      }

      // coordinate values range from [-cubeH/2, +cubeH/2]
      // here we're fixing moving the range to [0, +cubeH]
      uvY = uvY+cubeH/2;
      uvX = uvX+cubeH/2;

      // each UV coordinate represents decimal range [0, +1]
      uvY = uvY/cubeH;
      uvX = uvX/cubeH;

      // since the image contains multiple texture tiles (8 of them = 6 with
      // images + 2 dummy, which were added so that the width is a multiple of 2),
      // [uvX] must be adjusted to point to the part of the image
      // containing current tile
      uvX = (uvX+tileIx)/8;

      uvs.push( new THREE.Vector2( uvX, uvY ) );
    }

    geometry.faceVertexUvs[ 0 ].push( uvs );
  });

  geometry.uvsNeedUpdate = true;

  return(geometry);
}
我已经仔细检查了上述函数生成的值,一切看起来都很好 - UV 值与图像宽度和高度相乘时会产生正确的像素值。这是转储:
Face VerticeA   VerticeB   VerticeC
 0: (    0,1), (    0,0), (0.125,1)
 1: (    0,0), (0.125,0), (0.125,1)
 2: (0.125,1), (0.125,0), ( 0.25,1)
 3: (0.125,0), ( 0.25,0), ( 0.25,1)
 4: ( 0.25,1), ( 0.25,0), (0.375,1)
 5: ( 0.25,0), (0.375,0), (0.375,1)
 6: (0.375,1), (0.375,0), (  0.5,1)
 7: (0.375,0), (  0.5,0), (  0.5,1)
 8: (  0.5,1), (  0.5,0), (0.625,1)
 9: (  0.5,0), (0.625,0), (0.625,1)
10: (0.625,1), (0.625,0), ( 0.75,1)
11: (0.625,0), ( 0.75,0), ( 0.75,1)
我做错了什么还是Three.js有问题?
附注 该测试基于 example found on Three.js website
P.P.S
可以找到一个非常相似的问题HERE (虽然它不涉及手动计算UV贴图)
最佳答案
在摆弄这个问题一段时间并睡个好觉后,我发现问题是由相邻图 block 的像素引起的,这些像素在面边缘泄漏。这种情况不会发生,图像会被分割成更小的独立部分(即通过 Canvas ),因为相邻图 block 中的像素不会被复制。
可以通过(重新)排列源图像中的图 block 来解决该问题,以便将它们放置在应用到立方体时它们的下一个图 block 旁边。这样,如果像素确实在边缘发光,那么它就是正确的像素。
在上述问题的示例使用的图像中,图 block 按以下方式排序:西-东-上-下-南-北。正确的顺序应该是东-南-西-北+顶部+底部。
该序列边缘的图 block 仍然存在问题,谁的边缘仍然与错误的图 block 相邻: * 北 - 它的右边缘应与东连接 * 顶部 - 它的左边缘应与东连接,右边缘应与西连接 * 底部 - 左边缘为西,右边缘为东
为了解决这个问题,我们需要在北、顶部和底部之间放置一些空间。然后我们可以从东和西图 block 的边缘复制粘贴一条狭窄的垂直条,并将它们粘贴到北、顶部和底部边缘旁边。这将防止错误的像素透过。
下图显示了原始图像以及最终结果应该是什么样子(添加到图 block 中的 strip 用蓝色字母标记):
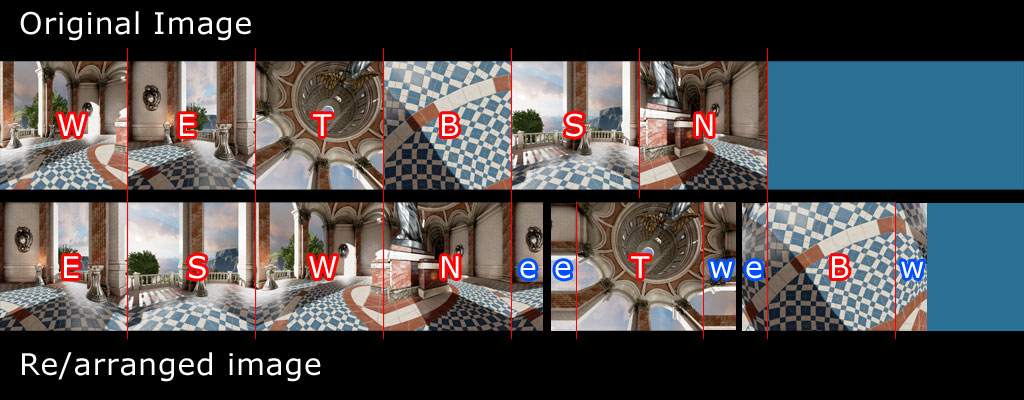
还有两件事需要注意:
- 图像的尺寸,需要是 2 的幂(宽度和高度)...否则 WebGLRenderer 会提示
- 顶部和底部图 block 放置一个 X 坐标,该坐标在 UV 坐标中形成一个小数位很少的有理数,WebGL 计算出的起始像素将是一个孔号(即顶部为 4.5*1024,顶部为 6*1024)底部)
比较这两种方法的该解决方案的实例可以在CodePen.io中找到。
由于图 block 已重新排列,我需要修复 UV 映射功能:
function mapCubeUV_v2(geometry, cubeH) {

  // converting all vertices into polar coordinates
  geometry.faceVertexUvs[0] = []; // This clears out any UV mapping that may have already existed on the object

  // walking through all the faces defined by the object
  // ... we need to define a UV map for each of them
  geometry.faces.forEach(function(face) {

    var uvs = [];

    var ids = [ 'a', 'b', 'c'],
        faceSign = face.normal.x+'.'+face.normal.y+'.'+face.normal.z;

    for( var i = 0; i < ids.length; i++ ) {

      // using the point to access the vertice
      var vertexIndex = face[ ids[ i ] ],
          vertex = geometry.vertices[ vertexIndex ],
          tileIx,
          uvY, uvX;

      // face order in the image: East, South, West, North, Up, Down
      switch(faceSign) {
        case '-1.0.0': // East
          uvY = vertex.y;
          uvX = vertex.z;
          tileIx = 0;
          break;
        case '0.0.1': // South
          uvY = vertex.y;
          uvX = vertex.x;
          tileIx = 1;
          break;
        case '1.0.0': // West
          uvY = vertex.y;
          uvX = -vertex.z;
          tileIx = 2;
          break;
        case '0.0.-1': // North
          uvY = vertex.y;
          uvX = -vertex.x;
          tileIx = 3;
          break;
        case '0.1.0': // Up
          uvY = -vertex.z;
          uvX = vertex.x;
          tileIx = 4.5; // "up" is 1.5 tile width distance from "north"
          break;
        case '0.-1.0': // Down
          uvY = vertex.z;
          uvX = vertex.x;
          tileIx = 6; // "down" if further 1.5 widths distance from "up"
          break;
                     }

      // coordinate values range from [-cubeH/2, +cubeH/2]
      // here we're fixing moving the range to [0, +cubeH]
      uvY = uvY+cubeH/2;
      uvX = uvX+cubeH/2;

      // each UV coordinate represents decimal range [0, +1]
      uvY = uvY/cubeH;
      uvX = uvX/cubeH;

      // since the image contains multiple texture tiles (8 of them),
      // [uvX] must be adjusted to point to the part of the image
      // containing current tile
      uvX = (uvX+tileIx)/8;
      console.log(uvX);

      // if(faceSign!=='1.0.0') {
      //    uvY = uvX = 0;
      // }

      uvs.push( new THREE.Vector2( uvX, uvY ) );
    }

    geometry.faceVertexUvs[ 0 ].push( uvs );
  });

  geometry.uvsNeedUpdate = true;

  return(geometry);
}
关于javascript - Three.js 中的 UV 映射立方体未正确连接面,我们在Stack Overflow上找到一个类似的问题: https://stackoverflow.com/questions/43401684/