我想遵循卷积神经网络(CNN)方法。但是,github中的此代码使用Pytorch,而我正在使用Keras。
我想重现6,7和8框,其中从ImageNet上的VGG-16下载了预先训练的权重,并用于使CNN收敛更快。
特别是,有一部分(方框8)是从VGG-16下载和跳过权重的部分,在SegNet(CNN模型)中没有对等项。在我的工作中,我使用的是U-Net而不是Segnet的CNN模型。我正在使用的U-Net Keras代码可以找到here。
我是Keras的新手,非常感谢Keras代码中有关如何下载和跳过与我的U-Net模型不兼容的VGG权重的见解。
最佳答案
您要解决的技术称为“转移学习”-当将不同数据集上的预训练模型用作模型的一部分时,可以作为更好收敛的起点。它的直觉很简单:我们假设在训练了诸如ImageNet这样的大数据集之后,模型的卷积核将学习有用的表示。
在您的特定情况下,您想在底部堆积VGG16权重,在顶部堆积反卷积块。正如您指出的那样,我将逐步介绍Keras。该答案按逐步教程进行组织,将提供一些小片段供您在自己的代码中使用。
装载重量
在上面链接到的PyTorch代码中,首先定义了模型,然后才复制权重。我发现这种方法非常丰富,因为它包含许多不必要的代码。在这里,我们将首先加载VGG16,然后将其他层堆叠在顶部。
from keras import applications
from keras.layers import Input

# Loading without top layers, since you only need convolution. Note that by not
# specifying the shape of top layers, the input tensor shape is (None, None, 3),
# so you can use them for any size of images.
vgg_model = applications.VGG16(weights='imagenet', include_top=False)

# If you want to specify input tensor shape, e.g. 256x256 with 3 channels:
input_tensor = Input(shape=(256, 256, 3))
vgg_model = applications.VGG16(weights='imagenet',
                               include_top=False,
                               input_tensor=input_tensor)

# To see the models' architecture and layer names, run the following
vgg_model.summary()
在底部使用VGG16定义U-Net计算图
如前一段所述,您无需定义模型并复制权重。只需将其他层堆叠在
vgg_model之上:# Import the layers to be used in U-Net
from keras.layers import ...
# From the U-Net code you provided
def make_conv_block(nb_filters, input_tensor, block):
...
# Creating dictionary that maps layer names to the layers
layers = dict([(layer.name, layer) for layer in vgg_model.layers])
# Getting output tensor of the last VGG layer that we want to include.
# I don't know much about U-Net, but according to the code you provided,
# you don't need the last pooling layer, right?
vgg_top = layers['block5_conv3'].output
# Now getting bottom layers for multi-scale skip-layers
block1_conv2 = layers['block1_conv2'].output
block2_conv2 = layers['block2_conv2'].output
block3_conv3 = layers['block3_conv3'].output
block4_conv3 = layers['block4_conv3'].output
# Stacking the remaining layers of U-Net on top of it (modified from
# the U-Net code you provided)
up6 = Concatenate()([UpSampling2D(size=(2, 2))(vgg_top), block4_conv3])
conv6 = make_conv_block(256, up6, 6)
up7 = Concatenate()([UpSampling2D(size=(2, 2))(conv6), block3_conv3])
conv7 = make_conv_block(128, up7, 7)
up8 = Concatenate()([UpSampling2D(size=(2, 2))(conv7), block2_conv2])
conv8 = make_conv_block(64, up8, 8)
up9 = Concatenate()([UpSampling2D(size=(2, 2))(conv8), block1_conv2])
conv9 = make_conv_block(32, up9, 9)
conv10 = Conv2D(nb_labels, (1, 1), name='conv_10_1')(conv9)
x = Reshape((nb_rows * nb_cols, nb_labels))(conv10)
x = Activation('softmax')(x)
outputs = Reshape((nb_rows, nb_cols, nb_labels))(x)
我想强调,我们在本段中所做的只是为
U-Net定义计算图。该代码是专门为VGG16编写的,但是您可以根据需要针对其他体系结构对其进行修改。建立模型
在上一步之后,我们得到了一个计算图(我假设您对
Tensorflow使用Keras后端。如果使用的是Theano,建议您切换到Tensorflow,因为此框架已实现现在处于成熟状态)。现在,我们需要做以下事情:在此计算图的顶部创建模型
冻结底层,因为您不想破坏预先训练的重量
# Creating new model. Please note that this is NOT a Sequential() model
# as in commonly found tutorials on the internet.
from keras.models import Model
custom_model = Model(inputs=vgg_model.input, outputs=outputs)

# Make sure that the pre-trained bottom layers are not trainable.
# Here, I freeze all the layers of VGG16 (layers 0-18, including the
# pooling ones.
for layer in custom_model.layers[:19]:
    layer.trainable = False

# Do not forget to compile it before training
custom_model.compile(loss='your_loss',
                     optimizer='your_optimizer',
                     metrics=['your_metrics'])
“我很困惑”
假设您不熟悉
Keras和一般的深度学习(如您在问题中所承认的那样),我建议阅读以下文章,以进一步了解Keras的微调和迁移学习的过程:How CNNs see the world-一篇很棒的短篇文章,将使您直观地理解“转移学习”背后的肮脏法宝。
Building powerful image classification models using very little data-这将为您提供有关如何调整学习率和“释放”冻结层的更多见解。
当您学习框架时,文档是您最好的朋友。幸运的是,
Keras具有令人难以置信的documentation。问答环节
我们放在VGG之上的反卷积块来自UNET结构(即up6到conv10)?请确认。
是的,它与here相同,只是跳过连接层的名称不同(例如
block1_conv2而不是conv1)我们省略了conv层(即conv1至conv5)。您能和我分享为什么会这样吗?
我们不会离开或扔掉VGG网络的任何层。
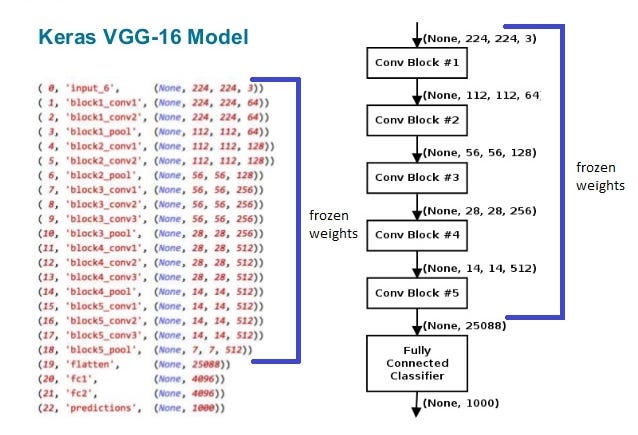
VGG16网络体系结构和U-Net的底层体系结构(直至conv5)非常相似。实际上,它们由以下格式的5块组成:+-----------------+-------------------+
| VGG conv blocks | U-Net conv blocks |
+-----------------+-------------------+
| blockX_conv1 | convN |
| ... | poolN |
| blockX_convN | |
| blockX_pool | |
+-----------------+-------------------+
Here是更好的可视化效果。因此,
VGG16和U-Net底部之间的唯一区别是VGG16的每个块都包含多个卷积层而不是一个。因此,将conv3连接到conv6的替代方法是将block3_conv3连接到conv6。 U-Net架构保持不变,只是底部有更多卷积层。无论如何,将最大池合并到转换层中(您认为我们在这里通过将它们排除在外来做什么,您会说这无关紧要吗?)
我们不会遗漏它们。我扔掉的唯一池化层是
block5_pool(这是VGG16底部的最后一层)-因为在原始U-Net(请参阅code)中,它看起来像是最后一个卷积块底部没有池层(我们有conv5但没有pool5)。我保留了VGG16的所有层。我们看到在卷积块上使用了Maxpooling。如果我们想将Segnet与VGG结合起来,是否还会简单地删除这些池化层(就像我们在此处使用Unet所做的那样)?
正如我在上面的问题中解释的那样,我们不会删除任何池化层。
但是,您将需要堆叠不同类型的池层,而不是默认
MaxPooling2D中使用的简单VGG16,因为SegNet会保留max-indexes。这可以通过tf.nn.max_pool_with_argmax并使用replacing middle layers of Keras model的技巧来实现(我不会在本答案中涵盖详细信息以保持其清洁)。替换无害,不需要重新训练,因为合并层不包含任何训练过的权重。here中的U-NET与我使用的U-NET不同,您能说出两者之间的这种差异会对您产生什么影响?
它是一个更浅的U-Net。您原始问题中的一个在底部有5个卷积块(
conv1-conv5),而后一个只有3个。根据数据选择所需的块数(例如,对于简单数据,可能需要像元一样)仅使用2-3个块,而灰质或组织分割可能需要5个块才能获得更好的质量。请参见this链接以了解“看到”了哪些卷积核。另外,您如何看待here中的VGGSegnet。它是否使用了您在问答中提到的中间层技巧?它相当于我最初发布的Pytorch代码吗?
有趣。这是一个错误的实现,并不等同于您发布的Pytorch代码。我已经在该存储库中打开了issue。
最后一个问题....在转移学习中是否总是将预训练模型(即带有预训练权重的模型)放在底部的规则?
通常是这样。将卷积核视为“特征”:第一层检测细小的边缘,颜色。接下来的层将这些边缘和颜色组合到更复杂的检测中,例如“黄线”或“蓝色圆圈”。然后,较高的卷积层基于较低层的检测来检测更多抽象的形状,例如“眼睛”,“鼻子”等。因此,替换底层(而高层取决于底层表示)是不合理的。
关于python - 如何在Keras中下载和跳过与CNN没有对应关系的VGG权重?,我们在Stack Overflow上找到一个类似的问题: https://stackoverflow.com/questions/48716184/