当使用QML相机拍摄照片时,照片的方向设置为使用哪个相机,图像将如下所示
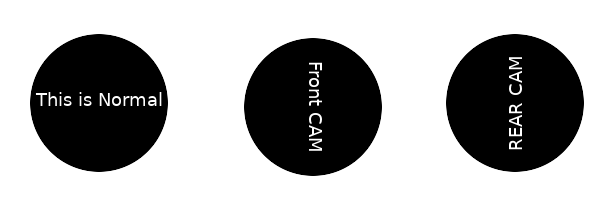
这是正常的 = 图像对于最终用户来说应该是什么样子,其余的都是不言自明的。
要在自定义 QML 图库中以正确的旋转/方向查看 qml 中的图像,只需将 autoTransform 设置为 true 即可。
GridView {
    id: images
    width: parent.width
    height: images.contentHeight

    FolderListModel {
        id: folderModel
        folder: "file:///sdcard/DCIM/"
        showDirs: false
        nameFilters: ["*.jpeg", "*.jpg", "*.png"]
    }

    Component {
        id: fileDelegate
        Row {
            Image {
                id: name
                width: 100
                height: 100
                source: fileURL
                sourceSize.width: 512
                sourceSize.height: 512
                autoTransform: true
                MouseArea {
                }
            }
        }
    }
    model: folderModel
    delegate: fileDelegate
    clip: true
}
在此示例中,无论使用哪个相机,或者图像是纵向还是横向,自动转换都会将图像显示为上面的图像“这是正常的”。
问题来自于选择一个图像并将其设置为另一个圆形的 qml 图像,而不是图像默认的正方形。
如果我使用
Image {
    id: userAvatar
    width: 150
    height: 150
    source: "image source set by an onClicked signal"
    autoTransform: true
}
这会将图像设置为正确的旋转/方向,但图像不是圆形的。为此,我们需要使用不透明蒙版
Rectangle {
    id: baseRectAvatar
    width: 100
    height: width
    color: "transparent"
    Layout.alignment: Qt.AlignHCenter
    Image {
        id: userAvatar
        source: "../../assets/profImg.png"
        width: 100
        height: 100
        fillMode: Image.PreserveAspectCrop
        autoTransform: true
        layer.enabled: true
        layer.effect: OpacityMask {
        maskSource: Item {
            width: userAvatar.width
            height: userAvatar.height
            // Rectangle {
            //     anchors.centerIn: parent
            //     width: userAvatar.adapt ? userAvatar.width : Math.min(userAvatar.width, userAvatar.height)
            //     height: userAvatar.adapt ? userAvatar.height : width
            //     radius: Math.min(width, height)
            // }

            Image {
                anchors.fill: parent
                source: "../../assets/profImg.png"
                autoTransform: true
            }
        }
    }
}
上面我尝试使用矩形和 qml 图像来尝试将图像旋转到正确的方向,但没有成功。 profImg 只是一个带有灰色圆圈和人的轮廓的透明背景。
当图像设置为 userAvatar 时,无论我做什么,自动变换都不再起作用,并且图像将显示为上面的示例图像。前摄像头或后摄像头取决于用于保存图像的相机。
我可以设置旋转值
Image {
    id: userAvatar
    width: 150
    height: 150
    source: "myImage.png"
    rotation: 90
}
但这仅适用于一台摄像机,而另一台摄像机的图像则颠倒。如果图像具有不透明蒙版,则必须直接将旋转设置为不透明蒙版本身,而不是在图像上。
最后我的问题是,你到底如何在 qml 中获得圆形图像,并且遵守 autoTransform 以正确的方向显示图像。即图像中的“这是正常的”。
最佳答案
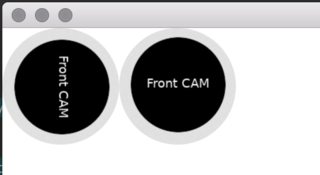
您不必将图像添加到蒙版本身中。它将应用于其源。因此,您可以简化代码并使用矩形作为不透明蒙版:
Item {
    anchors.fill: parent
    Row {
        Image {
            id: img
            source: "file:///cap1.jpg"
            width: 100
            height: 100
            fillMode: Image.PreserveAspectCrop
            layer.enabled: true
            //autoTransform: true
            layer.effect: OpacityMask {
                maskSource: mask
            }
        }
        Image {
            id: img2
            source: "file:///cap1.jpg"
            width: 100
            height: 100
            fillMode: Image.PreserveAspectCrop
            layer.enabled: true
            autoTransform: true
            layer.effect: OpacityMask {
                maskSource: mask
            }
        }
    }

    Rectangle {
        id: mask
        width: 100
        height: 100
        radius: 50
        visible: false
   }
}
图像将被舍入,对于第二个图像,方向将受到尊重:
关于android - 使用不透明蒙版时图像的自动变换失败,我们在Stack Overflow上找到一个类似的问题: https://stackoverflow.com/questions/56747670/