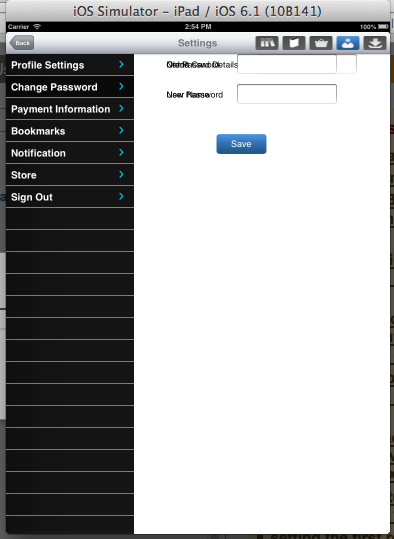
我正在我的 iPad 应用程序中使用一张表和一个 UIview。我想在表的选定行索引的第二个 View 中显示不同的选项。应用程序 UI 附于此。我的代码片段是这样的:-
- (void) tableView:(UITableView *)tableView didSelectRowAtIndexPath:(NSIndexPath *)indexPath{
NSUInteger row=indexPath.row;

UILabel *lblName, *lblUserName, *lblOldPassword, *lblCreditCardDetails, *lblNewPassword;

UITextField *txtName, *txtUserName, *txtOldPassword, *txtNewPassword, *txtCreditCardDetails;

UIButton *btnsaveprofile, *btnSavePassword, *btnSaveCreditCardDetails;

UIView *subView =[[UIView alloc] initWithFrame:CGRectMake(321, 0, 448, 980)];
[viewDetail addSubview:subView];

if (row==0) {

    [subView removeFromSuperview];

    UIView *subView =[[UIView alloc] initWithFrame:CGRectMake(0, 0, 448, 980)];
    [viewDetail addSubview:subView];

    lblName =[[UILabel alloc] initWithFrame:CGRectMake(0, 0, 140, 40)];
    lblName.text=@"Name";
    [lblName setBackgroundColor:[UIColor clearColor]];
    [subView addSubview:lblName];
    [lblName release];

    txtName =[[UITextField alloc] initWithFrame:CGRectMake(141, 0, 200, 40)];
    txtName.borderStyle=UITextBorderStyleRoundedRect;
    [subView addSubview:txtName];

    lblUserName =[[UILabel alloc] initWithFrame:CGRectMake(0, 60, 140, 40)];
    lblUserName.text=@"User Name";
    [lblUserName setBackgroundColor:[UIColor clearColor]];
    [subView addSubview:lblUserName];
    [lblUserName release];


    txtUserName =[[UITextField alloc] initWithFrame:CGRectMake(141, 60, 200, 40)];
    txtUserName.borderStyle=UITextBorderStyleRoundedRect;
    [subView addSubview:txtUserName];


    btnsaveprofile =[[UIButton alloc] initWithFrame:CGRectMake(100, 160, 100, 40)];
    [btnsaveprofile setTitle:@"Save" forState:UIControlStateNormal];
    [btnsaveprofile addTarget:self action:@selector(btnSaveProfile) forControlEvents:UIControlEventTouchUpInside];
    [subView addSubview:btnsaveprofile];


}
if (row==1) {

   [subView removeFromSuperview];

    UIView *subView1 =[[UIView alloc] initWithFrame:CGRectMake(0, 0, 448, 980)];
    [viewDetail addSubview:subView1];

    lblOldPassword =[[UILabel alloc] initWithFrame:CGRectMake(0, 0, 140, 40)];
    lblOldPassword.text=@"Old Password";
    [lblOldPassword setBackgroundColor:[UIColor clearColor]];
    [subView1 addSubview:lblOldPassword];


    txtOldPassword =[[UITextField alloc] initWithFrame:CGRectMake(141, 0, 200, 40)];
    txtOldPassword.secureTextEntry=YES;
    txtOldPassword.borderStyle=UITextBorderStyleRoundedRect;
    [subView1 addSubview:txtOldPassword];


    lblNewPassword =[[UILabel alloc] initWithFrame:CGRectMake(0, 60, 140, 40)];
    lblNewPassword.text=@"New Password";
    [lblNewPassword setBackgroundColor:[UIColor clearColor]];
    [subView1 addSubview:lblNewPassword];


    txtNewPassword =[[UITextField alloc] initWithFrame:CGRectMake(141, 60, 200, 40)];
    txtNewPassword.secureTextEntry=YES;
    txtNewPassword.borderStyle=UITextBorderStyleRoundedRect;
    [subView1 addSubview:txtNewPassword];


    btnSavePassword =[[UIButton alloc] initWithFrame:CGRectMake(100, 160, 100, 40)];
    [btnSavePassword setTitle:@"Save" forState:UIControlStateNormal];
    [btnSavePassword addTarget:self action:@selector(btnNavigationBarClicked) forControlEvents:UIControlEventTouchUpInside];
    [btnSavePassword setBackgroundImage:[UIImage imageNamed:@"btn_signin_bg.png"] forState:UIControlStateNormal];
    [subView1 addSubview:btnSavePassword];


}
if (row==2) {

    [subView removeFromSuperview];


    UIView *subView =[[UIView alloc] initWithFrame:CGRectMake(0, 0, 448, 980)];
    [viewDetail addSubview:subView];

    lblCreditCardDetails =[[UILabel alloc] initWithFrame:CGRectMake(0, 0, 180, 40)];
    lblCreditCardDetails.text=@"Credit Card Details";
    [lblCreditCardDetails setBackgroundColor:[UIColor clearColor]];
    [subView addSubview:lblCreditCardDetails];
    [lblCreditCardDetails release];

    txtCreditCardDetails =[[UITextField alloc] initWithFrame:CGRectMake(181, 0, 200, 40)];
    txtCreditCardDetails.secureTextEntry=YES;
    txtCreditCardDetails.borderStyle=UITextBorderStyleRoundedRect;
    [subView addSubview:txtCreditCardDetails];
    [txtCreditCardDetails release];


    btnSaveCreditCardDetails =[[UIButton alloc] initWithFrame:CGRectMake(100, 130, 100, 40)];
    [btnSaveCreditCardDetails setTitle:@"Save" forState:UIControlStateNormal];
    [btnSaveCreditCardDetails setBackgroundImage:[UIImage imageNamed:@"btn_signin_bg.png"] forState:UIControlStateNormal];
    [btnSaveCreditCardDetails addTarget:self action:@selector(btnSaveCreditCard) forControlEvents:UIControlEventTouchUpInside];
    [subView addSubview:btnSaveCreditCardDetails];
    [btnSaveCreditCardDetails release];
    btnSaveCreditCardDetails.hidden=YES;

}
我正在使用此代码,但不幸的是它与之前的 View 重叠。
我的问题是如何避免重叠或隐藏以前的 View 的方法。
最佳答案
我已经编辑了您的代码,您需要在添加其他 View 之前删除detailView的所有 subview ,因此只需使用以下代码:
- (void) tableView:(UITableView *)tableView didSelectRowAtIndexPath:(NSIndexPath *)indexPath{
NSUInteger row=indexPath.row;
UILabel *lblName, *lblUserName, *lblOldPassword, *lblCreditCardDetails, *lblNewPassword;
UITextField *txtName, *txtUserName, *txtOldPassword, *txtNewPassword, *txtCreditCardDetails;
UIButton *btnsaveprofile, *btnSavePassword, *btnSaveCreditCardDetails;
//UIView *subView =[[UIView alloc] initWithFrame:CGRectMake(321, 0, 448, 980)];
//[viewDetail addSubview:subView];

//Remove all subviews of viewDetail

  for (UIView *subviews in viewDetail.subviews)
    {
        [subviews removeFromSuperview];
    }

if (row==0) {
//    [subView removeFromSuperview];
    UIView *subView =[[UIView alloc] initWithFrame:CGRectMake(0, 0, 448, 980)];
    [viewDetail addSubview:subView];
    lblName =[[UILabel alloc] initWithFrame:CGRectMake(0, 0, 140, 40)];
    lblName.text=@"Name";
    [lblName setBackgroundColor:[UIColor clearColor]];
    [subView addSubview:lblName];
    [lblName release];
    txtName =[[UITextField alloc] initWithFrame:CGRectMake(141, 0, 200, 40)];
    txtName.borderStyle=UITextBorderStyleRoundedRect;
    [subView addSubview:txtName];
    lblUserName =[[UILabel alloc] initWithFrame:CGRectMake(0, 60, 140, 40)];
    lblUserName.text=@"User Name";
    [lblUserName setBackgroundColor:[UIColor clearColor]];
    [subView addSubview:lblUserName];
    [lblUserName release];
    txtUserName =[[UITextField alloc] initWithFrame:CGRectMake(141, 60, 200, 40)];
    txtUserName.borderStyle=UITextBorderStyleRoundedRect;
    [subView addSubview:txtUserName];
    btnsaveprofile =[[UIButton alloc] initWithFrame:CGRectMake(100, 160, 100, 40)];
    [btnsaveprofile setTitle:@"Save" forState:UIControlStateNormal];
    [btnsaveprofile addTarget:self action:@selector(btnSaveProfile) forControlEvents:UIControlEventTouchUpInside];
    [subView addSubview:btnsaveprofile];
}
if (row==1) {
//   [subView removeFromSuperview];
    UIView *subView1 =[[UIView alloc] initWithFrame:CGRectMake(0, 0, 448, 980)];
    [viewDetail addSubview:subView1];
    lblOldPassword =[[UILabel alloc] initWithFrame:CGRectMake(0, 0, 140, 40)];
    lblOldPassword.text=@"Old Password";
    [lblOldPassword setBackgroundColor:[UIColor clearColor]];
    [subView1 addSubview:lblOldPassword];
    txtOldPassword =[[UITextField alloc] initWithFrame:CGRectMake(141, 0, 200, 40)];
    txtOldPassword.secureTextEntry=YES;
    txtOldPassword.borderStyle=UITextBorderStyleRoundedRect;
    [subView1 addSubview:txtOldPassword];
    lblNewPassword =[[UILabel alloc] initWithFrame:CGRectMake(0, 60, 140, 40)];
    lblNewPassword.text=@"New Password";
    [lblNewPassword setBackgroundColor:[UIColor clearColor]];
    [subView1 addSubview:lblNewPassword];
    txtNewPassword =[[UITextField alloc] initWithFrame:CGRectMake(141, 60, 200, 40)];
    txtNewPassword.secureTextEntry=YES;
    txtNewPassword.borderStyle=UITextBorderStyleRoundedRect;
    [subView1 addSubview:txtNewPassword];
    btnSavePassword =[[UIButton alloc] initWithFrame:CGRectMake(100, 160, 100, 40)];
    [btnSavePassword setTitle:@"Save" forState:UIControlStateNormal];
    [btnSavePassword addTarget:self action:@selector(btnNavigationBarClicked) forControlEvents:UIControlEventTouchUpInside];
    [btnSavePassword setBackgroundImage:[UIImage imageNamed:@"btn_signin_bg.png"] forState:UIControlStateNormal];
    [subView1 addSubview:btnSavePassword];
}
if (row==2) {
 //   [subView removeFromSuperview];
    UIView *subView =[[UIView alloc] initWithFrame:CGRectMake(0, 0, 448, 980)];
    [viewDetail addSubview:subView];
    lblCreditCardDetails =[[UILabel alloc] initWithFrame:CGRectMake(0, 0, 180, 40)];
    lblCreditCardDetails.text=@"Credit Card Details";
    [lblCreditCardDetails setBackgroundColor:[UIColor clearColor]];
    [subView addSubview:lblCreditCardDetails];
    [lblCreditCardDetails release];
    txtCreditCardDetails =[[UITextField alloc] initWithFrame:CGRectMake(181, 0, 200, 40)];
    txtCreditCardDetails.secureTextEntry=YES;
    txtCreditCardDetails.borderStyle=UITextBorderStyleRoundedRect;
    [subView addSubview:txtCreditCardDetails];
    [txtCreditCardDetails release];
    btnSaveCreditCardDetails =[[UIButton alloc] initWithFrame:CGRectMake(100, 130, 100, 40)];
    [btnSaveCreditCardDetails setTitle:@"Save" forState:UIControlStateNormal];
    [btnSaveCreditCardDetails setBackgroundImage:[UIImage imageNamed:@"btn_signin_bg.png"] forState:UIControlStateNormal];
    [btnSaveCreditCardDetails addTarget:self action:@selector(btnSaveCreditCard) forControlEvents:UIControlEventTouchUpInside];
    [subView addSubview:btnSaveCreditCardDetails];
    [btnSaveCreditCardDetails release];
    btnSaveCreditCardDetails.hidden=YES;
}
关于iphone - 如何在 iPad 中显示和隐藏所选表格行索引的 View ?,我们在Stack Overflow上找到一个类似的问题: https://stackoverflow.com/questions/16334550/