这是我的布局代码;
<?xml version="1.0" encoding="utf-8"?>
<LinearLayout xmlns:android="http://schemas.android.com/apk/res/android"
    android:orientation="vertical"
    android:layout_width="fill_parent"
    android:layout_height="fill_parent">

    <TextView android:text="@string/welcome"
        android:id="@+id/TextView"
        android:layout_width="fill_parent"
        android:layout_height="wrap_content">
    </TextView>

    <LinearLayout android:id="@+id/LinearLayout"
        android:orientation="horizontal"
        android:layout_width="wrap_content"
        android:layout_height="wrap_content"
        android:gravity="bottom">

            <EditText android:id="@+id/EditText"
                android:layout_width="fill_parent"
                android:layout_height="wrap_content">
            </EditText>

            <Button android:text="@string/label_submit_button"
                android:id="@+id/Button"
                android:layout_width="wrap_content"
                android:layout_height="wrap_content">
            </Button>

    </LinearLayout>

</LinearLayout>
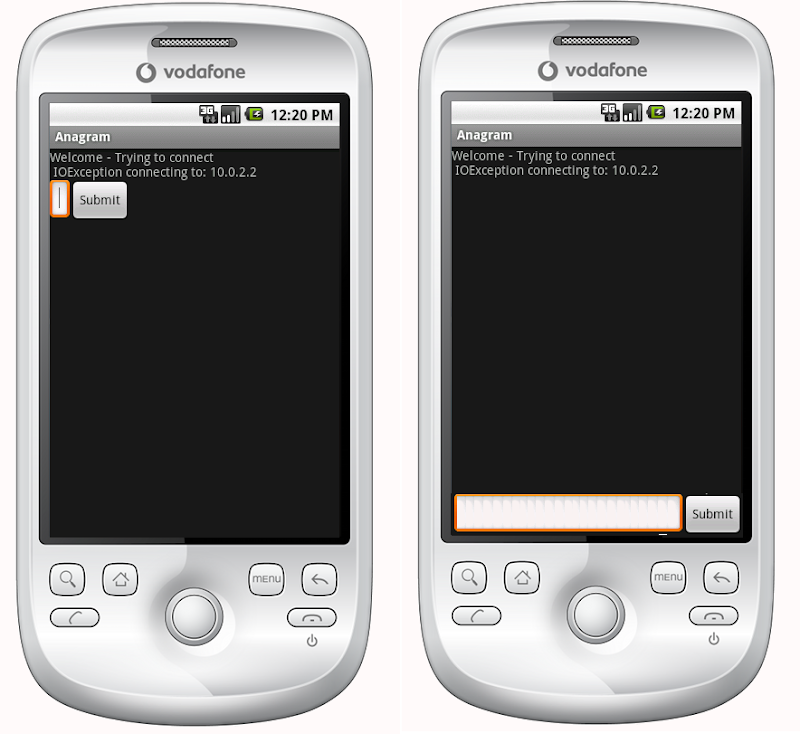
左边是这个样子,右边是我想要的样子。
显而易见的答案是将 TextView 的高度设置为 fill_parent,但这会导致按钮或输入字段没有空间。
本质上问题是我希望提交按钮和文本条目在底部具有固定高度,而 TextView 可以填充其余空间。同样,在水平线性布局中,我希望提交按钮包裹其内容并让文本条目填充其余空间。
如果线性布局中的第一个项目被告知填充父项,它会这样做,不会为其他项目留下空间。除了布局中其余项目所需的最小值之外,我如何获得线性布局中的第一个项目来填充所有空间?
相对布局确实是答案:
    <?xml version="1.0" encoding="utf-8"?>
    <RelativeLayout
    xmlns:android="http://schemas.android.com/apk/res/android"
    android:layout_width="fill_parent"
    android:layout_height="fill_parent">

    <TextView
        android:text="@string/welcome"
        android:id="@+id/TextView"
        android:layout_width="fill_parent"
        android:layout_height="wrap_content"
        android:layout_alignParentTop="true">
    </TextView>

    <RelativeLayout
        android:id="@+id/InnerRelativeLayout"
        android:layout_width="wrap_content"
        android:layout_height="wrap_content"
        android:layout_alignParentBottom="true" >

        <Button
            android:text="@string/label_submit_button"
            android:id="@+id/Button"
            android:layout_alignParentRight="true"
            android:layout_width="wrap_content"
            android:layout_height="wrap_content">
        </Button>

        <EditText
            android:id="@+id/EditText"
            android:layout_width="fill_parent"
            android:layout_toLeftOf="@id/Button"
            android:layout_height="wrap_content">
        </EditText>

    </RelativeLayout>

</RelativeLayout>
最佳答案
执行此操作的现代方法是使用 ConstraintLayout并使用 app:layout_constraintBottom_toBottomOf="parent"
下面的示例创建了一个 FloatingActionButton,它将与屏幕的末端和底部对齐。
<android.support.constraint.ConstraintLayout
   xmlns:android="http://schemas.android.com/apk/res/android"
   xmlns:app="http://schemas.android.com/apk/res-auto"
   xmlns:tools="http://schemas.android.com/tools"
   android:layout_height="match_parent"
   android:layout_width="match_parent">

<android.support.design.widget.FloatingActionButton
    android:layout_height="wrap_content"
    android:layout_width="wrap_content"

    app:layout_constraintBottom_toBottomOf="parent"

    app:layout_constraintEnd_toEndOf="parent" />

</android.support.constraint.ConstraintLayout>
作为引用,我会保留我的旧答案。
在引入 ConstraintLayout 之前,答案是 relative layout .
如果你有一个填满整个屏幕的相对布局,你应该可以使用 android:layout_alignParentBottom将按钮移动到屏幕底部。
如果您在底部的 View 没有显示在相对布局中,那么它上面的布局可能会占用所有空间。在这种情况下,您可以将应该位于底部的 View 首先放在布局文件中,然后使用 android:layout_above 将其余布局放置在 View 上方。这使得底部 View 可以根据需要占用尽可能多的空间,并且布局的其余部分可以填满屏幕的所有其余部分。
关于android - 如何对齐屏幕底部的 View ?,我们在Stack Overflow上找到一个类似的问题: https://stackoverflow.com/questions/2386866/