由于 Windows Azure 中的错误,Windows 8 应用程序中与 Azure REST API 一起使用的所有自签名客户端证书都必须指定为扩展验证证书。
为了提供更好的用户体验,我尝试在远程服务器上生成此自签名证书。我正在使用Certificate Enrolment API ,作为 Windows 的一部分分发的 COM 库,如 this answer 中所述。对于问题How to create a self-signed certificate using C#?
代码基本上是相同的,只是为了我自己的使用而稍加修改:
public static X509Certificate2 CreateSelfSignedCertificate(
    string cname,
    string friendlyName,
    string password)
{
    // create DN for subject and issuer
    var dn = new CX500DistinguishedName();
    dn.Encode("CN=" + cname, X500NameFlags.XCN_CERT_NAME_STR_NONE);

    // create a new private key for the certificate
    CX509PrivateKey privateKey = new CX509PrivateKey();
    privateKey.ProviderName = "Microsoft Base Cryptographic Provider v1.0";
    privateKey.MachineContext = true;
    privateKey.Length = 2048;
    privateKey.KeySpec = X509KeySpec.XCN_AT_SIGNATURE; // use is not limited
    privateKey.ExportPolicy
        = X509PrivateKeyExportFlags.XCN_NCRYPT_ALLOW_PLAINTEXT_EXPORT_FLAG;
    privateKey.Create();

    // Use the stronger SHA512 hashing algorithm
    var hashobj = new CObjectId();
    hashobj.InitializeFromAlgorithmName(
        ObjectIdGroupId.XCN_CRYPT_HASH_ALG_OID_GROUP_ID,
        ObjectIdPublicKeyFlags.XCN_CRYPT_OID_INFO_PUBKEY_ANY,
        AlgorithmFlags.AlgorithmFlagsNone,
        "SHA512");

    // Create the self signing request
    var cert = new CX509CertificateRequestCertificate();
    cert.InitializeFromPrivateKey(
        X509CertificateEnrollmentContext.ContextMachine,
        privateKey,
        string.Empty);

    cert.Subject = dn;
    cert.Issuer = dn; // the issuer and the subject are the same
    cert.NotBefore = DateTime.Now;
    cert.NotAfter = DateTime.Now.AddYears(50);
    cert.HashAlgorithm = hashobj;

    var clientAuthenticationOid = new CObjectId();
    clientAuthenticationOid.InitializeFromValue("1.3.6.1.5.5.7.3.2");

    // Set up cert to be used for Client Authentication.
    var oids = new CObjectIds();
    oids.Add(clientAuthenticationOid);

    var eku = new CX509ExtensionEnhancedKeyUsage();
    eku.InitializeEncode(oids);

    cert.X509Extensions.Add((CX509Extension)eku);

    // Add the certificate policy.
    var policy = new CCertificatePolicy();
    policy.Initialize(clientAuthenticationOid);

    // THIS IS WRONG - NEEDS A DIFFERENT QUALIFIER
    var qualifier = new CPolicyQualifier();
    qualifier.InitializeEncode(
        "c0",
         PolicyQualifierType.PolicyQualifierTypeUserNotice);

    policy.PolicyQualifiers.Add(qualifier);

    var policies = new CCertificatePolicies();
    policies.Add(policy);

    var ecp = new CX509ExtensionCertificatePolicies();
    ecp.InitializeEncode(policies);

    cert.X509Extensions.Add((CX509Extension)ecp);

    cert.Encode();

    // Do the final enrolment process
    var enroll = new CX509Enrollment();
    enroll.InitializeFromRequest(cert); // load the certificate
    enroll.CertificateFriendlyName = friendlyName;
    string csr = enroll.CreateRequest(); // Output the request in base64

    // and install it back as the response
    enroll.InstallResponse(
        InstallResponseRestrictionFlags.AllowUntrustedCertificate,
        csr,
        EncodingType.XCN_CRYPT_STRING_BASE64,
        ""); // no password

    // output a base64 encoded PKCS#12 for import to .NET
    var base64encoded = enroll.CreatePFX(
        password,
        PFXExportOptions.PFXExportChainWithRoot);

    // instantiate the target class with the PKCS#12 data
    return new X509Certificate2(
        System.Convert.FromBase64String(base64encoded),
        password,
        X509KeyStorageFlags.Exportable);
}
我找到了 ICertificatePolicy接口(interface)似乎代表了正确的结构类型,但我无法推断出正确的 IPolicyQualifier使用。在我的代码中,限定符是
为了清楚起见,您可以在此处配置 Windows 8 证书管理器中的信息:
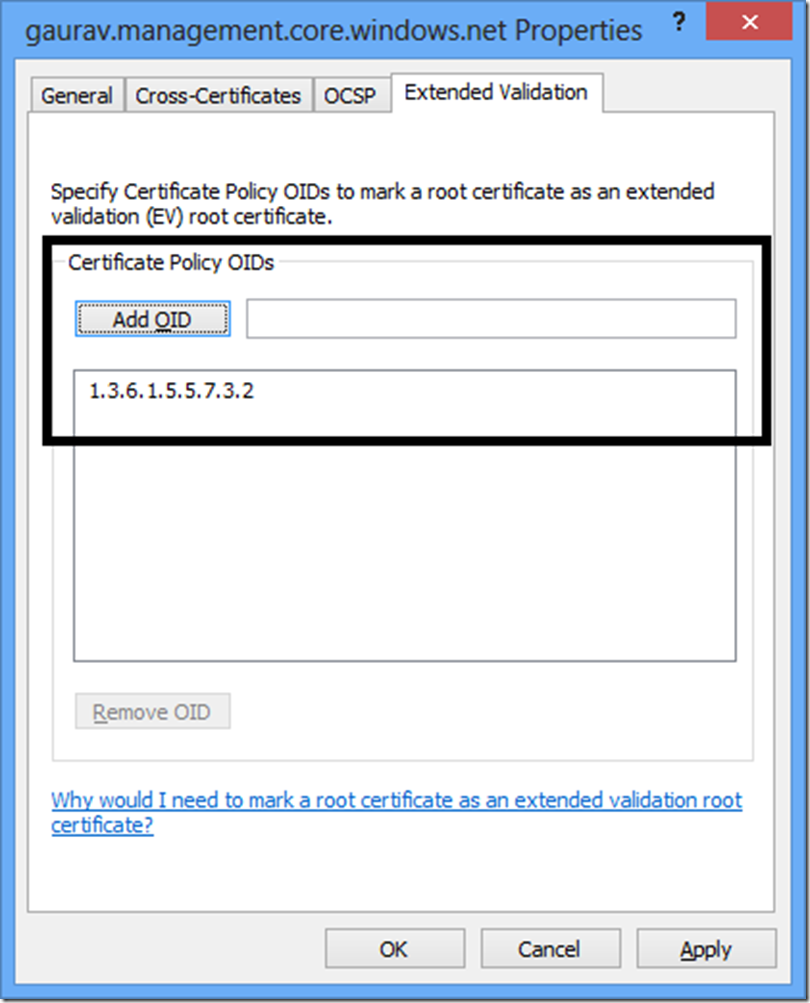
这会在证书上产生此属性:

我的代码当前生成此属性:

接近,但尚未实现。
是否有另一种方法可以将数据加载到 IPolicyQualifier 中,以便它产生预期的结果,也许使用 InitialiseDecode 方法?
最佳答案
如果您想将客户端身份验证 OID 设置为“1.3.6.1.5.5.7.2”,那么我认为您的代码确实按预期工作。如何验证代码中没有设置这个值?
我编写了以下代码来使用您的代码保存生成的证书:
X509Certificate2 xx = CreateSelfSignedCertificate("Avkash CNAME", "Test User Friendly Name", "xx");
byte[] bCertExported = xx.Export(X509ContentType.Pkcs12, "xx");
File.WriteAllBytes("c:\\Installbox\\test.pfx", bCertExported);
在我本地安装证书并检查客户端身份验证 OID 后,它确实显示如下:

关于c# - 如何使用 CertEnroll 生成扩展验证自签名证书?,我们在Stack Overflow上找到一个类似的问题: https://stackoverflow.com/questions/14588150/