我想在多行 App Store Collection View 中复制分页:

到目前为止,我已经将它设计得尽可能接近它的外观,包括显示对上一个和下一个单元格的窥视,但不知道如何使分页工作,所以它会捕捉下一组 3 :
override func viewDidLoad() {
    super.viewDidLoad()

    collectionView.collectionViewLayout = MultiRowLayout(
        rowsCount: 3,
        inset: 16
    )
}

...

class MultiRowLayout: UICollectionViewFlowLayout {
    private var rowsCount: CGFloat = 0

    convenience init(rowsCount: CGFloat, spacing: CGFloat? = nil, inset: CGFloat? = nil) {
        self.init()

        self.scrollDirection = .horizontal
        self.minimumInteritemSpacing = 0
        self.rowsCount = rowsCount

        if let spacing = spacing {
            self.minimumLineSpacing = spacing
        }

        if let inset = inset {
            self.sectionInset = UIEdgeInsets(top: 0, left: inset, bottom: 0, right: inset)
        }
    }

    override func prepare() {
        super.prepare()

        guard let collectionView = collectionView else { return }
        self.itemSize = calculateItemSize(from: collectionView.bounds.size)
    }

    override func shouldInvalidateLayout(forBoundsChange newBounds: CGRect) -> Bool {
        guard let collectionView = collectionView,
            !newBounds.size.equalTo(collectionView.bounds.size) else {
                return false
        }

        itemSize = calculateItemSize(from: collectionView.bounds.size)
        return true
    }
}

private extension MultiRowLayout {

    func calculateItemSize(from bounds: CGSize) -> CGSize {
        return CGSize(
            width: bounds.width - minimumLineSpacing * 2 - sectionInset.left,
            height: bounds.height / rowsCount
        )
    }
}
不幸的是,UICollectionView 上的原生 isPagingEnabled 标志仅在单元格为 Collection View 的 100% 宽度时才有效,因此用户不会看到并且上一个和下一个单元格。
我有一个工作 snap paging functionality但仅适用于每页的单个项目,而不是这种 3 行的集合。有人可以帮助使快照分页适用于分组行而不是每页单个项目吗?
最佳答案
没有理由仅仅为了这种行为而对 UICollectionViewFlowLayout 进行子类化。
UICollectionView是UIScrollView的子类,所以它的委托(delegate)协议(protocol)UICollectionViewDelegate是UIScrollViewDelegate的子类。这意味着您可以在 Collection View 的委托(delegate)中实现任何 UIScrollViewDelegate 的方法。
在您的 Collection View 的委托(delegate)中,实现 scrollViewWillEndDragging(_:withVelocity:targetContentOffset:) 以将目标内容偏移舍入到最近的单元格列的左上角。
这是一个示例实现:
override func scrollViewWillEndDragging(_ scrollView: UIScrollView, withVelocity velocity: CGPoint, targetContentOffset: UnsafeMutablePointer<CGPoint>) {
    let layout = collectionViewLayout as! UICollectionViewFlowLayout
    let bounds = scrollView.bounds
    let xTarget = targetContentOffset.pointee.x

    // This is the max contentOffset.x to allow. With this as contentOffset.x, the right edge of the last column of cells is at the right edge of the collection view's frame.
    let xMax = scrollView.contentSize.width - scrollView.bounds.width

    if abs(velocity.x) <= snapToMostVisibleColumnVelocityThreshold {
        let xCenter = scrollView.bounds.midX
        let poses = layout.layoutAttributesForElements(in: bounds) ?? []
        // Find the column whose center is closest to the collection view's visible rect's center.
        let x = poses.min(by: { abs($0.center.x - xCenter) < abs($1.center.x - xCenter) })?.frame.origin.x ?? 0
        targetContentOffset.pointee.x = x
    } else if velocity.x > 0 {
        let poses = layout.layoutAttributesForElements(in: CGRect(x: xTarget, y: 0, width: bounds.size.width, height: bounds.size.height)) ?? []
        // Find the leftmost column beyond the current position.
        let xCurrent = scrollView.contentOffset.x
        let x = poses.filter({ $0.frame.origin.x > xCurrent}).min(by: { $0.center.x < $1.center.x })?.frame.origin.x ?? xMax
        targetContentOffset.pointee.x = min(x, xMax)
    } else {
        let poses = layout.layoutAttributesForElements(in: CGRect(x: xTarget - bounds.size.width, y: 0, width: bounds.size.width, height: bounds.size.height)) ?? []
        // Find the rightmost column.
        let x = poses.max(by: { $0.center.x < $1.center.x })?.frame.origin.x ?? 0
        targetContentOffset.pointee.x = max(x, 0)
    }
}

// Velocity is measured in points per millisecond.
private var snapToMostVisibleColumnVelocityThreshold: CGFloat { return 0.3 }
结果:
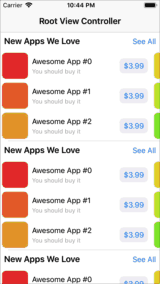
您可以在此处找到我的测试项目的完整源代码:https://github.com/mayoff/multiRowSnapper
关于ios - 如何将水平分页捕捉到像 App Store 这样的多行 Collection View ?,我们在Stack Overflow上找到一个类似的问题: https://stackoverflow.com/questions/51014482/