无论是呈现模态还是用户执行任何类型的转场。
有没有办法在整个应用程序中使按钮“始终位于顶部”(而不是屏幕顶部)?
有什么办法可以使这个按钮可拖动和可捕捉到屏幕?
我正在将 Apple 自己的辅助触控视为此类按钮的示例。
最佳答案
您可以通过创建您自己的 UIWindow 子类来做到这一点。 ,然后创建该子类的实例。你需要对窗口做三件事:
windowLevel到一个非常高的数字,例如 CGFloat.max .它被限制(从 iOS 9.2 开始)为 10000000,但您不妨将其设置为尽可能高的值。 pointInside(_:withEvent:)仅对按钮中的点返回 true 的方法。这将使窗口只接受点击按钮的触摸,所有其他触摸将传递到其他窗口。 然后为窗口创建一个根 View Controller 。创建按钮并将其添加到 View 层次结构中,并将其告知窗口以便窗口可以在
pointInside(_:withEvent:) 中使用它。 .还有最后一件事要做。事实证明,屏幕键盘也使用最高的窗口级别,并且由于它可能会在您的窗口出现后出现在屏幕上,因此它将位于您的窗口顶部。你可以通过观察
UIKeyboardDidShowNotification 来解决这个问题并重置窗口的 windowLevel当发生这种情况时(因为这样做被记录为将您的窗口放在同一级别的所有窗口之上)。这是一个演示。我将从我将在窗口中使用的 View Controller 开始。
import UIKit

class FloatingButtonController: UIViewController {
这是按钮实例变量。谁创建了
FloatingButtonController可以访问按钮以向其添加目标/操作。我稍后会证明这一点。 private(set) var button: UIButton!
你必须“实现”这个初始化器,但我不会在 Storyboard中使用这个类。
    required init?(coder aDecoder: NSCoder) {
        fatalError()
    }
这是真正的初始化程序。
    init() {
        super.init(nibName: nil, bundle: nil)
        window.windowLevel = CGFloat.max
        window.hidden = false
        window.rootViewController = self
设置
window.hidden = false将其显示在屏幕上(当前 CATransaction 提交时)。我还需要注意键盘出现: NSNotificationCenter.defaultCenter().addObserver(self, selector: "keyboardDidShow:", name: UIKeyboardDidShowNotification, object: nil)
}
我需要对我的窗口的引用,它将是一个自定义类的实例:
private let window = FloatingButtonWindow()
我将在代码中创建我的 View 层次结构以保持此答案自包含:
    override func loadView() {
        let view = UIView()
        let button = UIButton(type: .Custom)
        button.setTitle("Floating", forState: .Normal)
        button.setTitleColor(UIColor.greenColor(), forState: .Normal)
        button.backgroundColor = UIColor.whiteColor()
        button.layer.shadowColor = UIColor.blackColor().CGColor
        button.layer.shadowRadius = 3
        button.layer.shadowOpacity = 0.8
        button.layer.shadowOffset = CGSize.zero
        button.sizeToFit()
        button.frame = CGRect(origin: CGPointMake(10, 10), size: button.bounds.size)
        button.autoresizingMask = []
        view.addSubview(button)
        self.view = view
        self.button = button
        window.button = button
没有什么特别的事情发生。我只是创建我的根 View 并在其中放置一个按钮。
为了允许用户拖动按钮,我将向按钮添加一个平移手势识别器:
        let panner = UIPanGestureRecognizer(target: self, action: "panDidFire:")
        button.addGestureRecognizer(panner)
    }
窗口将在首次出现时以及调整大小时(特别是由于界面旋转)布置其 subview ,因此我想在这些时间重新定位按钮:
    override func viewDidLayoutSubviews() {
        super.viewDidLayoutSubviews()
        snapButtonToSocket()
    }
(稍后会详细介绍
snapButtonToSocket。)为了处理拖动按钮,我以标准方式使用平移手势识别器:
    func panDidFire(panner: UIPanGestureRecognizer) {
        let offset = panner.translationInView(view)
        panner.setTranslation(CGPoint.zero, inView: view)
        var center = button.center
        center.x += offset.x
        center.y += offset.y
        button.center = center
您要求“捕捉”,因此如果平底锅即将结束或取消,我会将按钮捕捉到我称为“ socket ”的固定数量位置之一:
        if panner.state == .Ended || panner.state == .Cancelled {
            UIView.animateWithDuration(0.3) {
                self.snapButtonToSocket()
            }
        }
    }
我通过重置
window.windowLevel 来处理键盘通知: func keyboardDidShow(note: NSNotification) {
window.windowLevel = 0
window.windowLevel = CGFloat.max
}
要将按钮卡入 socket ,我找到离按钮位置最近的 socket 并将按钮移到那里。请注意,这不一定是您想要的界面旋转,但我会为读者留下一个更完美的解决方案作为练习。无论如何,它会在旋转后将按钮保持在屏幕上。
    private func snapButtonToSocket() {
        var bestSocket = CGPoint.zero
        var distanceToBestSocket = CGFloat.infinity
        let center = button.center
        for socket in sockets {
            let distance = hypot(center.x - socket.x, center.y - socket.y)
            if distance < distanceToBestSocket {
                distanceToBestSocket = distance
                bestSocket = socket
            }
        }
        button.center = bestSocket
    }
我在屏幕的每个角落放了一个 socket ,中间放了一个用于演示:
    private var sockets: [CGPoint] {
        let buttonSize = button.bounds.size
        let rect = view.bounds.insetBy(dx: 4 + buttonSize.width / 2, dy: 4 + buttonSize.height / 2)
        let sockets: [CGPoint] = [
            CGPointMake(rect.minX, rect.minY),
            CGPointMake(rect.minX, rect.maxY),
            CGPointMake(rect.maxX, rect.minY),
            CGPointMake(rect.maxX, rect.maxY),
            CGPointMake(rect.midX, rect.midY)
        ]
        return sockets
    }

}
最后,定制
UIWindow子类:private class FloatingButtonWindow: UIWindow {
var button: UIButton?
init() {
super.init(frame: UIScreen.mainScreen().bounds)
backgroundColor = nil
}
required init?(coder aDecoder: NSCoder) {
fatalError("init(coder:) has not been implemented")
}
正如我提到的,我需要覆盖
pointInside(_:withEvent:)以便窗口忽略按钮外的触摸: private override func pointInside(point: CGPoint, withEvent event: UIEvent?) -> Bool {
guard let button = button else { return false }
let buttonPoint = convertPoint(point, toView: button)
return button.pointInside(buttonPoint, withEvent: event)
}
}
现在你如何使用这个东西?我下载了 Apple's AdaptivePhotos sample project并添加了我的
FloatingButtonController.swift文件到 AdaptiveCode目标。我向 AppDelegate 添加了一个属性:var floatingButtonController: FloatingButtonController?
然后我在
application(_:didFinishLaunchingWithOptions:)的末尾添加了代码创建一个 FloatingButtonController : floatingButtonController = FloatingButtonController()
floatingButtonController?.button.addTarget(self, action: "floatingButtonWasTapped", forControlEvents: .TouchUpInside)
这些行就在
return true 之前在函数的最后。我还需要为按钮编写操作方法:func floatingButtonWasTapped() {
let alert = UIAlertController(title: "Warning", message: "Don't do that!", preferredStyle: .Alert)
let action = UIAlertAction(title: "Sorry…", style: .Default, handler: nil)
alert.addAction(action)
window?.rootViewController?.presentViewController(alert, animated: true, completion: nil)
}
这就是我所要做的。但是为了演示目的,我又做了一件事:在 AboutViewController 中,我更改了
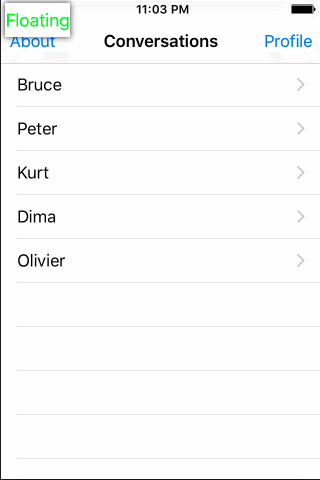
label到 UITextView所以我有办法调出键盘。这是按钮的样子:
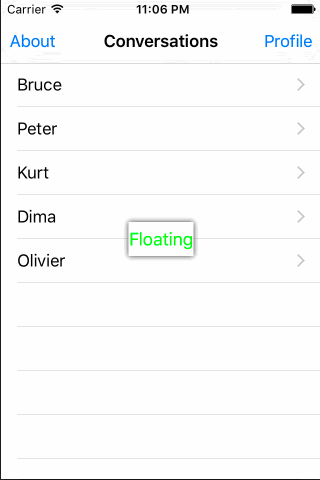
这是点击按钮的效果。请注意,按钮 float 在警报上方:
当我打开键盘时会发生以下情况:

它处理旋转吗?你打赌:

好吧,旋转处理并不完美,因为旋转后哪个 socket 离按钮最近,可能与旋转前的“逻辑” socket 不同。您可以通过跟踪按钮上次捕捉到哪个插槽并专门处理旋转(通过检测大小变化)来解决此问题。
我把整个
FloatingViewController.swift在 this gist为了您的方便。
关于ios - 在 iOS 中,如何创建一个始终位于所有其他 View Controller 之上的按钮?,我们在Stack Overflow上找到一个类似的问题: https://stackoverflow.com/questions/34777558/