这是来自 matlab 的原始代码:
 % Calculate each separated object area
    cDist=regionprops(bwImg, 'Area');
    cDist=[cDist.Area];

    % Label each object
    [bwImgLabeled, ~]=bwlabel(bwImg);

    % Calculate min and max object size based on assumptions on the color
    % checker size
    maxLabelSize = prod(size(imageData)./[4 6]);
    minLabelSize = prod(size(imageData)./[4 6]./10);

    % Find label indices for objects that are too large or too small
    remInd = find(cDist > maxLabelSize);
    remInd = [remInd find(cDist < minLabelSize)];

    % Remove over/undersized objects
    for n=1:length(remInd)
        ri = bwImgLabeled == remInd(n);
        bwImgLabeled(ri) = 0;
这是我使用 openCV 的代码
//regionprops(bwImg, 'Area');
// cDist=[cDist.Area]
//cv::FileStorage file("C:\\Users\\gdarmon\\Desktop\\gili.txt", cv::FileStorage::WRITE);
//
//file << dst;
dst.convertTo(dst,CV_8U);
cv::vector<cv::vector<cv::Point> > contours;
cv::vector<cv::Vec4i> hierarchy;
cv::findContours(dst,contours,hierarchy,CV_RETR_CCOMP, CV_CHAIN_APPROX_NONE);

std::vector<cv::Moments> mu(contours.size());
for (int i = 0; i < contours.size(); i++)
{
    mu[i] = cv::moments(contours[i],false);
}
vector<cv::Point2f> mc( contours.size() );
for( int i = 0; i < contours.size(); i++ )
{
    mc[i] = cv::Point2f( mu[i].m10/mu[i].m00 , mu[i].m01/mu[i].m00 );
}
从现在开始,我有了想要使用 bwlabel 函数的轮廓
1. 我认为完成标记是为了连接 4-8 个对象。
你能解释一下标签到底是什么吗?我愿意提供任何链接。
2. connected components in OpenCV
在这篇文章中,有些人在谈论 CVblob,有些人在谈论 opecv 的 cvContourArea,你能解释一下区别吗?什么更适合我的用例?
更新: 这是我使用 cvBlobs 尝试过的
IplImage* img_bw = new IplImage(dst);
CBlobResult blobs;
CBlob *currentBlob;
blobs = CBlobResult(img_bw, NULL, 0);
// Exclude all white blobs smaller than the given value (80)
// The bigger the last parameter, the bigger the blobs need
// to be for inclusion
blobs.Filter( blobs,
    B_EXCLUDE,
    CBlobGetArea(),
    B_LESS,
    80 );

// Get the number of blobs discovered
int num_blobs = blobs.GetNumBlobs();

// Display the filtered blobs
IplImage* filtered = cvCreateImage( cvGetSize( img_bw ),
    IPL_DEPTH_8U,
    3 );

cvMerge( img_bw, img_bw, img_bw, NULL, filtered );

for ( int i = 0; i < num_blobs; i++ )
{
    currentBlob = blobs.GetBlob( i );
    currentBlob->FillBlob( filtered, CV_RGB(255,0,0));
}

// Display the input / output windows and images
cvNamedWindow( "input" );
cvNamedWindow( "output" );
cvShowImage("input", img_bw );

cvShowImage("output", filtered);
cv::waitKey(0);

 /*% Calculate min and max object size based on assumptions on the color
% checker size
maxLabelSize = prod(size(imageData)./[4 6]);
minLabelSize = prod(size(imageData)./[4 6]./10);*/
double maxLabelSize = (dst.rows/4.0) * (dst.cols/6.0);
double minLabelSize = ((dst.rows/40.0) * (dst.cols/60.0));
最佳答案
- i have figured that labeling is done in order to get connected 4-8 objects. can you please explain what is labeling actually is? I would aapriciate any link.
关于标记实际作用的最清晰的演示是在 bwlabel 的 Matlab 文档中。 .如果将原始矩阵 BW 与生成的矩阵 L 进行比较,您会看到它采用二值图像并为 1 的每个连接组分配唯一标签的:
L =

     1     1     1     0     0     0     0     0
     1     1     1     0     2     2     0     0
     1     1     1     0     2     2     0     0
     1     1     1     0     0     0     3     0
     1     1     1     0     0     0     3     0
     1     1     1     0     0     0     3     0
     1     1     1     0     0     3     3     0
     1     1     1     0     0     0     0     0
这里标记了三个组件。这个例子寻找 4-connected 组件;如果一个像素位于当前像素的左侧、右侧、上方或下方,则该像素被认为连接到当前像素。 8 连接的对象包括对角线,这将导致标签 2 和 3 被合并为上面的矩阵,因为对象 2 的右下角和对象的顶部3个是对角相连的。维基百科描述了连通分量标记算法 here .
2.connected components in OpenCV in this article some people are talking about CVblob and some about opecv's cvContourArea, can you explain the difference. and what will be better suited for my use case?
OpenCV 3.0 已结束测试版并有两个全新的方法:connectedComponents 和 connectedComponentsWithStats ( documentation )。如果您正在尝试复制 Matlab 的 bwlabel,这是可行的方法。
我编写了一个测试程序来尝试 connectedComponentsWithStats(下面的完整代码),使用它作为我的测试图像:
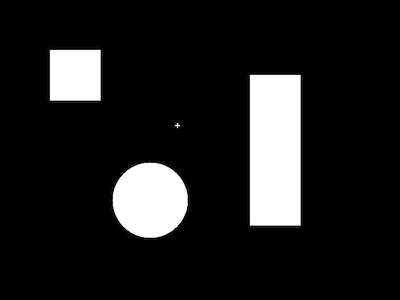
(实际上,此图像从 800x600 缩小到 400x300,但生成它的代码包含在下面。)
我使用以下方法生成了标记图像:
int nLabels = connectedComponentsWithStats(src, labels, stats, centroids, 8, CV_32S);
nLabels 中返回的值为 5。请记住,此方法将背景视为标签 0。
要查看标记区域是什么,您可以将灰度值从 [0..nLabels-1] 放大到 [0..255],或者您可以分配随机 RGB 值并创建彩色图像。对于这个测试,我只是打印了几个我知道位于不同组件中的位置的值。
cout << "Show label values:" << endl;
// Middle of square at top-left
int component1Pixel = labels.at<int>(150,150);
cout << "pixel at(150,150) = " << component1Pixel << endl;
// Middle of rectangle at far right
int component2Pixel = labels.at<int>(300,550);
cout << "pixel at(300,550) = " << component2Pixel << endl << endl;

Show label values:
pixel at(150,150) = 1
pixel at(300,550) = 2
stats 是一个 5 x nLabels 垫,包含每个组件(包括背景)的 left、top、width、height 和 area .对于这张图片:
stats:
(left,top,width,height,area)
[0, 0, 800, 600, 421697;
 100, 100, 101, 101, 10201;
 500, 150, 101, 301, 30401;
 350, 246, 10, 10, 36;
 225, 325, 151, 151, 17665]
您会注意到组件 0 是图像的完整宽度/高度。将所有区域相加,得到 480,000 = 800x600。前 4 个元素可用于创建边界矩形:
Rect(Point(left,top), Size(width,height))
centroids 是一个 2 x nLabels Mat,包含每个组件的质心的 x, y 坐标:
centroids:
(x, y)
[398.8575636060963, 298.8746232484461;
 150, 150;
 550, 300;
 354.5, 250.5;
 300, 400]
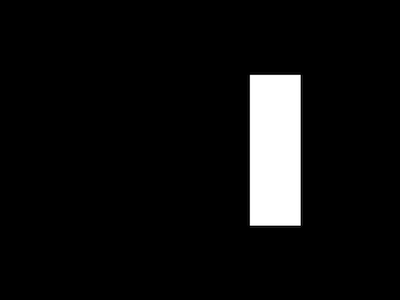
最后,在某些时候您可能想要单独对其中一个组件进行进一步处理。在这里,我使用 compare 生成一个新的 Mat only2,它只包含来自 labels 的标记为 2 的像素。
compare(labels, 2, only2, CMP_EQ);
compare 有助于将这些像素设置为新图像中的 255 值,以便您可以看到结果:
完整代码如下:
#include "opencv2/highgui/highgui.hpp"
#include "opencv2/imgcodecs.hpp"
#include "opencv2/imgproc/imgproc.hpp"
#include <iostream>

using namespace std;
using namespace cv;

int main(int argc, const char * argv[]) {

    // Create an image
    const int color_white = 255;
    Mat src = Mat::zeros(600, 800, CV_8UC1);

    rectangle(src, Point(100, 100), Point(200, 200), color_white, CV_FILLED);
    rectangle(src, Point(500, 150), Point(600, 450), color_white, CV_FILLED);
    rectangle(src, Point(350,250), Point(359,251), color_white, CV_FILLED);
    rectangle(src, Point(354,246), Point(355,255), color_white, CV_FILLED);
    circle(src, Point(300, 400), 75, color_white, CV_FILLED);

    imshow("Original", src);

    // Get connected components and stats
    const int connectivity_8 = 8;
    Mat labels, stats, centroids;

    int nLabels = connectedComponentsWithStats(src, labels, stats, centroids, connectivity_8, CV_32S);

    cout << "Number of connected components = " << nLabels << endl << endl;

    cout << "Show label values:" << endl;
    int component1Pixel = labels.at<int>(150,150);
    cout << "pixel at(150,150) = " << component1Pixel << endl;
    int component2Pixel = labels.at<int>(300,550);
    cout << "pixel at(300,550) = " << component2Pixel << endl << endl;

    // Statistics
    cout << "Show statistics and centroids:" << endl;
    cout << "stats:" << endl << "(left,top,width,height,area)" << endl << stats << endl << endl;
    cout << "centroids:" << endl << "(x, y)" << endl << centroids << endl << endl;

    // Print individual stats for component 1 (component 0 is background)
    cout << "Component 1 stats:" << endl;
    cout << "CC_STAT_LEFT   = " << stats.at<int>(1,CC_STAT_LEFT) << endl;
    cout << "CC_STAT_TOP    = " << stats.at<int>(1,CC_STAT_TOP) << endl;
    cout << "CC_STAT_WIDTH  = " << stats.at<int>(1,CC_STAT_WIDTH) << endl;
    cout << "CC_STAT_HEIGHT = " << stats.at<int>(1,CC_STAT_HEIGHT) << endl;
    cout << "CC_STAT_AREA   = " << stats.at<int>(1,CC_STAT_AREA) << endl;

    // Create image with only component 2
    Mat only2;
    compare(labels, 2, only2, CMP_EQ);

    imshow("Component 2", only2);

    waitKey(0);

}
关于c++ - openCV 2.4.10 bwlabel - 连通分量,我们在Stack Overflow上找到一个类似的问题: https://stackoverflow.com/questions/29108270/