我有以下使用 UIBezierPath 绘制线条的代码。
代码使用 addCurveToPoint 应该使用三次贝塞尔路径绘制曲线,但是代码的最终结果是绘制连接的直线,但 addLineToPoint 不是正在使用中。
可能是怎么回事,为什么代码没有绘制曲线?

import UIKit

class DrawingView: UIView, UITextFieldDelegate {

// Modifiable values within the code
let lineWidth : CGFloat = 2.0
let lineColor = UIColor.redColor()
let lineColorAlpha : CGFloat = 0.4
let shouldAllowUserChangeLineWidth = true
let maximumUndoRedoChances = 10

var path = UIBezierPath()

var previousImages : [UIImage] = [UIImage]()

// Represents current image index
var currentImageIndex = 0

// Control points for drawing curve smoothly
private var controlPoint1 : CGPoint?
private var controlPoint2 : CGPoint?

private var undoButton : UIButton!
private var redoButton : UIButton!

private var textField : UITextField!

//MARK: Init methods
override init(frame: CGRect) {
    super.init(frame: frame)
    setDefaultValues()
}

required init?(coder aDecoder: NSCoder) {
    super.init(coder: aDecoder)
    setDefaultValues()
}

// Draw the path when needed
override func drawRect(rect: CGRect) {
    if currentImageIndex > 0 {
        previousImages[currentImageIndex - 1].drawInRect(rect)
    }

    lineColor.setStroke()
    path.strokeWithBlendMode(CGBlendMode.Normal, alpha: lineColorAlpha)
}

override func layoutSubviews() {
    super.layoutSubviews()

    redoButton.frame = CGRectMake(bounds.size.width - 58, 30, 50, 44)
    if shouldAllowUserChangeLineWidth {
        textField.center = CGPointMake(center.x, 52)
    }
}

func setDefaultValues() {
    multipleTouchEnabled = false
    backgroundColor = UIColor.whiteColor()
    path.lineWidth = lineWidth

    addButtonsAndField()
}

func addButtonsAndField() {
    undoButton = UIButton(frame: CGRectMake(8, 30, 50, 44))
    undoButton.setTitle("Undo", forState: UIControlState.Normal)
    undoButton.setTitleColor(UIColor.blackColor(), forState: UIControlState.Normal)
    undoButton.backgroundColor = UIColor.lightGrayColor()
    undoButton.addTarget(self, action: "undoButtonTapped:", forControlEvents: UIControlEvents.TouchUpInside)
    addSubview(undoButton)

    redoButton = UIButton(frame: CGRectMake(bounds.size.width - 58, 30, 50, 44))
    redoButton.setTitle("Redo", forState: UIControlState.Normal)
    redoButton.setTitleColor(UIColor.blackColor(), forState: UIControlState.Normal)
    redoButton.backgroundColor = UIColor.lightGrayColor()
    redoButton.addTarget(self, action: "redoButtonTapped:", forControlEvents: UIControlEvents.TouchUpInside)
    addSubview(redoButton)

    if shouldAllowUserChangeLineWidth {
        textField = UITextField(frame: CGRectMake(0, 0, 50, 40))
        textField.backgroundColor = UIColor.lightGrayColor()
        textField.center = CGPointMake(center.x, 52)
        textField.keyboardType = UIKeyboardType.NumberPad
        textField.delegate = self
        addSubview(textField)
    }
}

//MARK: Touches methods
override func touchesBegan(touches: Set<UITouch>, withEvent event: UIEvent?) {
    // Find the start point and move the path there
    endEditing(true)

    let touchPoint = touches.first?.locationInView(self)

    path.moveToPoint(touchPoint!)
}

override func touchesMoved(touches: Set<UITouch>, withEvent event: UIEvent?) {
    let touchPoint = touches.first?.locationInView(self)
    controlPoint1 = CGPointMake((path.currentPoint.x + touchPoint!.x) / 2, (path.currentPoint.y + touchPoint!.y) / 2)
    controlPoint2 = CGPointMake((path.currentPoint.x + touchPoint!.x) / 2, (path.currentPoint.y + touchPoint!.y) / 2)

    path.addCurveToPoint(touchPoint!, controlPoint1: controlPoint1!, controlPoint2: controlPoint2!)
    setNeedsDisplay()
}

override func touchesEnded(touches: Set<UITouch>, withEvent event: UIEvent?) {
    let touchPoint = touches.first?.locationInView(self)
    controlPoint1 = CGPointMake((path.currentPoint.x + touchPoint!.x) / 2, (path.currentPoint.y + touchPoint!.y) / 2)
    controlPoint2 = CGPointMake((path.currentPoint.x + touchPoint!.x) / 2, (path.currentPoint.y + touchPoint!.y) / 2)

    path.addCurveToPoint(touchPoint!, controlPoint1: controlPoint1!, controlPoint2: controlPoint2!)

    savePreviousImage()
    setNeedsDisplay()

    // Remove all points to optimize the drawing speed
    path.removeAllPoints()
}

override func touchesCancelled(touches: Set<UITouch>?, withEvent event: UIEvent?) {
    touchesEnded(touches!, withEvent: event)
}

//MARK: Selector methods
func undoButtonTapped(sender : UIButton) {
    if currentImageIndex > 0 {

        setNeedsDisplay()

        currentImageIndex--
    }
}

func redoButtonTapped(sender : UIButton) {
    if currentImageIndex != previousImages.count {

        setNeedsDisplay()

        currentImageIndex++
    }
}

//MARK: UITextFieldDelegate
func textFieldDidEndEditing(textField: UITextField) {
    if let n = NSNumberFormatter().numberFromString(textField.text!) {
        if n.integerValue > 0 {
            path.lineWidth = CGFloat(n)
        }
    }
}

//MARK: Saving images for reloading when undo or redo called
private func savePreviousImage() {
    UIGraphicsBeginImageContextWithOptions(bounds.size, true, UIScreen.mainScreen().scale)
    lineColor.setStroke()

    // Create a image with white color
    let rectPath = UIBezierPath(rect: bounds)
    backgroundColor?.setFill()
    rectPath.fill()

    if currentImageIndex > 0 {
        previousImages[currentImageIndex - 1].drawInRect(bounds)
    }

    path.strokeWithBlendMode(CGBlendMode.Normal, alpha: lineColorAlpha)

    if previousImages.count >= currentImageIndex {
        previousImages.removeRange(currentImageIndex..<previousImages.count)
    }

    if previousImages.count >= maximumUndoRedoChances {
        previousImages.removeFirst()
    }
    else {
        currentImageIndex++
    }

    previousImages.append(UIGraphicsGetImageFromCurrentImageContext())
    UIGraphicsEndImageContext()
}
}
最佳答案
有几个问题:
您正在使用位于两点之间的中点的控制点,从而生成线段。您可能想要选择平滑曲线的控制点。参见 http://spin.atomicobject.com/2014/05/28/ios-interpolating-points/ .
这是一个简单平滑算法的 Swift 3 实现,以及上述 Hermite 和 Catmull-Rom 样条方法的 Swift 再现:
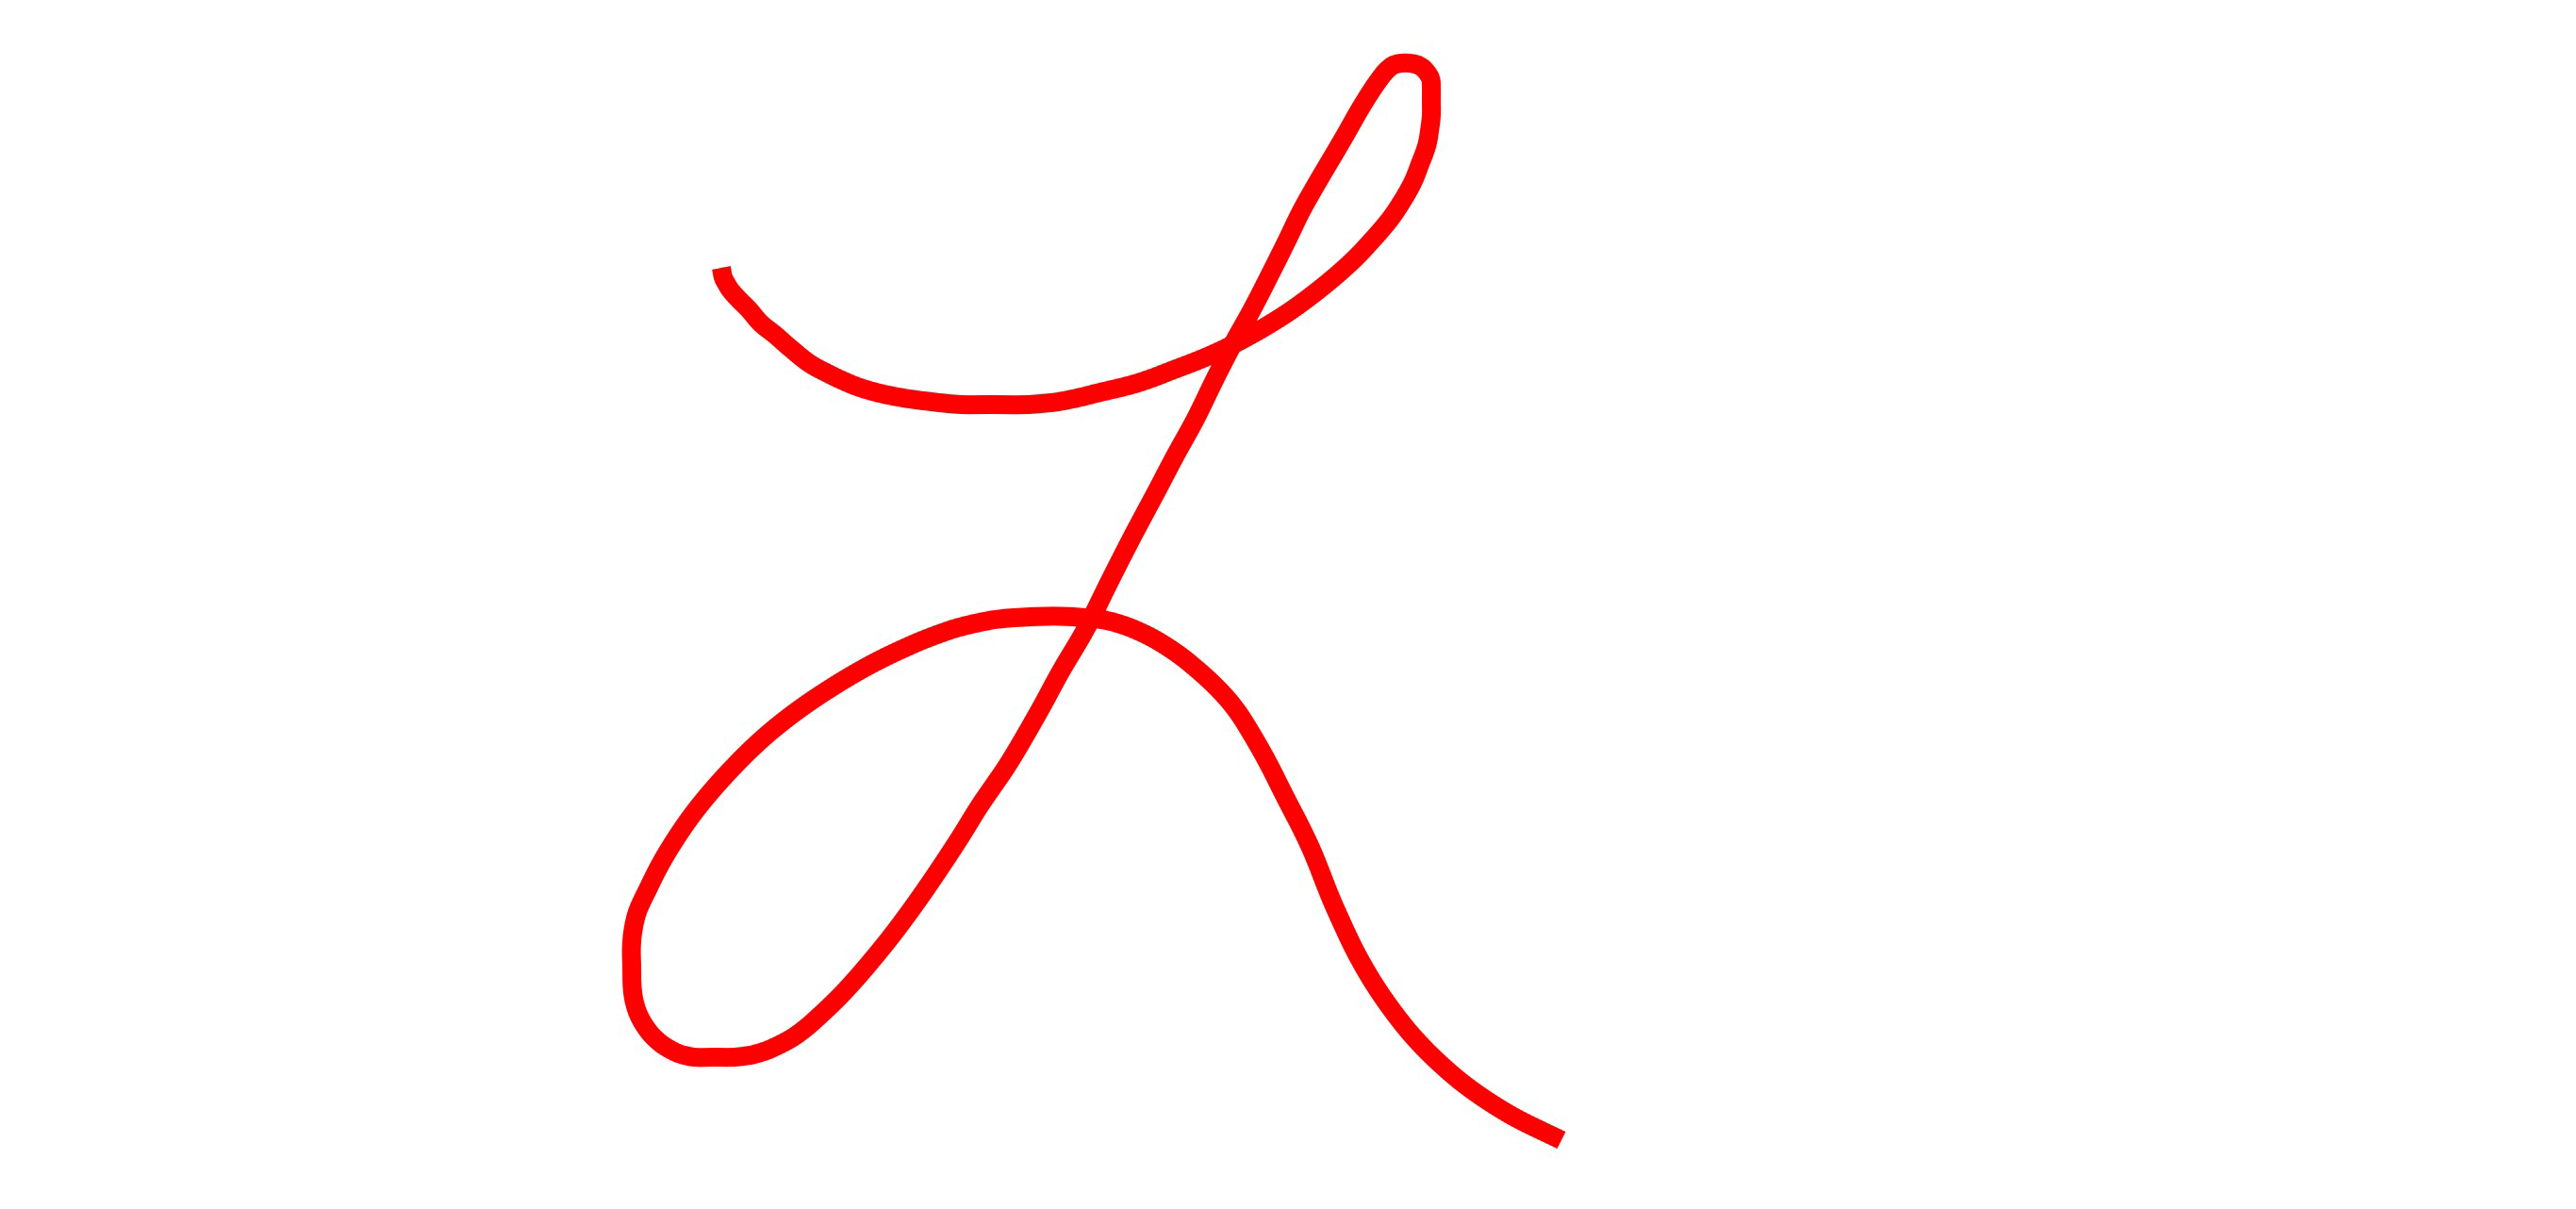
extension UIBezierPath {

    /// Simple smoothing algorithm
    ///
    /// This iterates through the points in the array, drawing cubic bezier
    /// from the first to the fourth points, using the second and third as
    /// control points.
    ///
    /// This takes every third point and moves it so that it is exactly inbetween
    /// the points before and after it, which ensures that there is no discontinuity
    /// in the first derivative as you join these cubic beziers together.
    ///
    /// Note, if, at the end, there are not enough points for a cubic bezier, it
    /// will perform a quadratic bezier, or if not enough points for that, a line.
    ///
    /// - parameter points: The array of `CGPoint`.

    convenience init?(simpleSmooth points: [CGPoint]) {
        guard points.count > 1 else { return nil }

        self.init()

        move(to: points[0])

        var index = 0

        while index < (points.count - 1) {
            switch (points.count - index) {
            case 2:
                index += 1
                addLine(to: points[index])
            case 3:
                index += 2
                addQuadCurve(to: points[index], controlPoint: points[index-1])
            case 4:
                index += 3
                addCurve(to: points[index], controlPoint1: points[index-2], controlPoint2: points[index-1])
            default:
                index += 3
                let point = CGPoint(x: (points[index-1].x + points[index+1].x) / 2,
                                    y: (points[index-1].y + points[index+1].y) / 2)
                addCurve(to: point, controlPoint1: points[index-2], controlPoint2: points[index-1])
            }
        }
    }

    /// Create smooth UIBezierPath using Hermite Spline
    ///
    /// This requires at least two points.
    ///
    /// Adapted from https://github.com/jnfisher/ios-curve-interpolation
    /// See http://spin.atomicobject.com/2014/05/28/ios-interpolating-points/
    ///
    /// - parameter hermiteInterpolatedPoints: The array of CGPoint values.
    /// - parameter closed:                    Whether the path should be closed or not
    ///
    /// - returns:  An initialized `UIBezierPath`, or `nil` if an object could not be created for some reason (e.g. not enough points).

    convenience init?(hermiteInterpolatedPoints points: [CGPoint], closed: Bool) {
        self.init()

        guard points.count > 1 else { return nil }

        let numberOfCurves = closed ? points.count : points.count - 1

        var previousPoint: CGPoint? = closed ? points.last : nil
        var currentPoint:  CGPoint  = points[0]
        var nextPoint:     CGPoint? = points[1]

        move(to: currentPoint)

        for index in 0 ..< numberOfCurves {
            let endPt = nextPoint!

            var mx: CGFloat
            var my: CGFloat

            if previousPoint != nil {
                mx = (nextPoint!.x - currentPoint.x) * 0.5 + (currentPoint.x - previousPoint!.x)*0.5
                my = (nextPoint!.y - currentPoint.y) * 0.5 + (currentPoint.y - previousPoint!.y)*0.5
            } else {
                mx = (nextPoint!.x - currentPoint.x) * 0.5
                my = (nextPoint!.y - currentPoint.y) * 0.5
            }

            let ctrlPt1 = CGPoint(x: currentPoint.x + mx / 3.0, y: currentPoint.y + my / 3.0)

            previousPoint = currentPoint
            currentPoint = nextPoint!
            let nextIndex = index + 2
            if closed {
                nextPoint = points[nextIndex % points.count]
            } else {
                nextPoint = nextIndex < points.count ? points[nextIndex % points.count] : nil
            }

            if nextPoint != nil {
                mx = (nextPoint!.x - currentPoint.x) * 0.5 + (currentPoint.x - previousPoint!.x) * 0.5
                my = (nextPoint!.y - currentPoint.y) * 0.5 + (currentPoint.y - previousPoint!.y) * 0.5
            }
            else {
                mx = (currentPoint.x - previousPoint!.x) * 0.5
                my = (currentPoint.y - previousPoint!.y) * 0.5
            }

            let ctrlPt2 = CGPoint(x: currentPoint.x - mx / 3.0, y: currentPoint.y - my / 3.0)

            addCurve(to: endPt, controlPoint1: ctrlPt1, controlPoint2: ctrlPt2)
        }

        if closed { close() }
    }

    /// Create smooth UIBezierPath using Catmull-Rom Splines
    ///
    /// This requires at least four points.
    ///
    /// Adapted from https://github.com/jnfisher/ios-curve-interpolation
    /// See http://spin.atomicobject.com/2014/05/28/ios-interpolating-points/
    ///
    /// - parameter catmullRomInterpolatedPoints: The array of CGPoint values.
    /// - parameter closed:                       Whether the path should be closed or not
    /// - parameter alpha:                        The alpha factor to be applied to Catmull-Rom spline.
    ///
    /// - returns:  An initialized `UIBezierPath`, or `nil` if an object could not be created for some reason (e.g. not enough points).

    convenience init?(catmullRomInterpolatedPoints points: [CGPoint], closed: Bool, alpha: CGFloat) {
        self.init()

        guard points.count > 3 else { return nil }

        assert(alpha >= 0 && alpha <= 1.0, "Alpha must be between 0 and 1")

        let endIndex = closed ? points.count : points.count - 2

        let startIndex = closed ? 0 : 1

        let kEPSILON: CGFloat = 1.0e-5

        move(to: points[startIndex])

        for index in startIndex ..< endIndex {
            let nextIndex = (index + 1) % points.count
            let nextNextIndex = (nextIndex + 1) % points.count
            let previousIndex = index < 1 ? points.count - 1 : index - 1

            let point0 = points[previousIndex]
            let point1 = points[index]
            let point2 = points[nextIndex]
            let point3 = points[nextNextIndex]

            let d1 = hypot(CGFloat(point1.x - point0.x), CGFloat(point1.y - point0.y))
            let d2 = hypot(CGFloat(point2.x - point1.x), CGFloat(point2.y - point1.y))
            let d3 = hypot(CGFloat(point3.x - point2.x), CGFloat(point3.y - point2.y))

            let d1a2 = pow(d1, alpha * 2)
            let d1a  = pow(d1, alpha)
            let d2a2 = pow(d2, alpha * 2)
            let d2a  = pow(d2, alpha)
            let d3a2 = pow(d3, alpha * 2)
            let d3a  = pow(d3, alpha)

            var controlPoint1: CGPoint, controlPoint2: CGPoint

            if abs(d1) < kEPSILON {
                controlPoint1 = point2
            } else {
                controlPoint1 = (point2 * d1a2 - point0 * d2a2 + point1 * (2 * d1a2 + 3 * d1a * d2a + d2a2)) / (3 * d1a * (d1a + d2a))
            }

            if abs(d3) < kEPSILON {
                controlPoint2 = point2
            } else {
                controlPoint2 = (point1 * d3a2 - point3 * d2a2 + point2 * (2 * d3a2 + 3 * d3a * d2a + d2a2)) / (3 * d3a * (d3a + d2a))
            }

            addCurve(to: point2, controlPoint1: controlPoint1, controlPoint2: controlPoint2)
        }

        if closed { close() }
    }

}

// Some functions to make the Catmull-Rom splice code a little more readable.
// These multiply/divide a `CGPoint` by a scalar and add/subtract one `CGPoint`
// from another.

func * (lhs: CGPoint, rhs: CGFloat) -> CGPoint {
    return CGPoint(x: lhs.x * rhs, y: lhs.y * CGFloat(rhs))
}

func / (lhs: CGPoint, rhs: CGFloat) -> CGPoint {
    return CGPoint(x: lhs.x / rhs, y: lhs.y / CGFloat(rhs))
}

func + (lhs: CGPoint, rhs: CGPoint) -> CGPoint {
    return CGPoint(x: lhs.x + rhs.x, y: lhs.y + rhs.y)
}

func - (lhs: CGPoint, rhs: CGPoint) -> CGPoint {
    return CGPoint(x: lhs.x - rhs.x, y: lhs.y - rhs.y)
}
这里分别是红色、蓝色和绿色的“简单”平滑算法、“Hermite”样条曲线和“Catmull Rom”样条曲线。如您所见,“简单”平滑算法在计算上更简单,但通常不会通过许多点(但提供了更显着的平滑,消除了笔划中的任何不稳定性)。像这样跳跃的点夸大了行为,而在标准的“手势”中,它提供了相当不错的平滑效果。另一方面,样条曲线在穿过数组中的点时平滑曲线。

如果针对 iOS 9 及更高版本,它会引入一些不错的功能,特别是:
合并触摸,以防用户使用具有此类功能的设备,尤其是较新的 iPad。最重要的是,这些设备(但不是它们的模拟器)每秒能够产生超过 60 次触摸,因此您可以在每次调用
touchesMoved时报告多次触摸。预测触摸,设备可以向您显示它预计用户触摸将进行的位置(从而减少绘图的延迟)。
把它们放在一起,你可能会做类似的事情:
var points: [CGPoint]?
var path: UIBezierPath?

override func touchesBegan(_ touches: Set<UITouch>, with event: UIEvent?) {
    if let touch = touches.first {
        points = [touch.location(in: view)]
    }
}

override func touchesMoved(_ touches: Set<UITouch>, with event: UIEvent?) {
    if let touch = touches.first {
        if #available(iOS 9.0, *) {
            if let coalescedTouches = event?.coalescedTouches(for: touch) {
                points? += coalescedTouches.map { $0.location(in: view) }
            } else {
                points?.append(touch.location(in: view))
            }

            if let predictedTouches = event?.predictedTouches(for: touch) {
                let predictedPoints = predictedTouches.map { $0.location(in: view) }
                pathLayer.path = UIBezierPath(catmullRomInterpolatedPoints: points! + predictedPoints, closed: false, alpha: 0.5)?.cgPath
            } else {
                pathLayer.path = UIBezierPath(catmullRomInterpolatedPoints: points!, closed: false, alpha: 0.5)?.cgPath
            }
        } else {
            points?.append(touch.location(in: view))
            pathLayer.path = UIBezierPath(catmullRomInterpolatedPoints: points!, closed: false, alpha: 0.5)?.cgPath
        }
    }
}

override func touchesEnded(_ touches: Set<UITouch>, with event: UIEvent?) {
    path = UIBezierPath(catmullRomInterpolatedPoints: points!, closed: false, alpha: 0.5)
    pathLayer.path = path?.cgPath
}
在此代码片段中,我通过更新
CAShapeLayer来呈现路径,但如果您想以其他方式呈现它,请随意。例如,使用drawRect方法,您将更新path,然后调用setNeedsDisplay()。并且,上面说明了
if#available(iOS 9, *) { ... } else { ... }语法,如果你需要支持 9.0 之前的 iOS 版本,但显然,如果您只支持 iOS 9 及更高版本,则可以删除该检查并丢失else子句。有关详细信息,请参阅 WWDC 2015 视频 Advanced Touch Input on iOS .
无论如何,这会产生如下内容:
(对于以上内容的 Swift 2.3 版本,请参阅此答案的 previous version。)
关于ios - 绘图类绘制直线而不是曲线,我们在Stack Overflow上找到一个类似的问题: https://stackoverflow.com/questions/34579957/